Showing posts with label TWD. Show all posts

December 28, 2011

TWD's last- Thumprint Cookies (and Christmas)

 
Oh my how the time has flown. This week is the LAST Tuesdays with Dorie recipe and the end of the year! I remember the shock I felt at how heavy the book felt when I first opened it and the end has come. Since I joined TWD I have gained the confidence to try new recipes, make substitutions and adaptations, burned through a million boxes of butter, and made a lot of new friends. I'm so grateful to Laurie and Dorie and all the other helpers along the way for such a wonderful experience (and a million favorite recipes).

 
Dorie chose this weeks recipe. These cookies came together in less than five minutes- butter, peanut butter, sugar, eggs, vanilla, and a little flour. Scoop and roll in egg whites and then chopped nuts (I used cashews since I had those on had), make a little 'thumbprint' and bake. Dorie suggests filling them with jam but I piped in some melted white chocolate. The end product is peanut buttery, crunchy and delicious (albeit rich!) My kids LOVED these and I am glad to have some extra dough in the freezer for another day. See the rest of the bunch here.


I hope you had a wonderful Christmas! We sure did. Baby Strawberry and I love her new play kitchen Nana built. It's shiny and red and came complete with her own KitchenAid (what more could a girl ask for?) Well, I do hope Santa drops off Baking with Julia a little late for me. I think my kitchen wouldn't be complete without a Dorie recipe each week- though there are certainly plenty of Baking recipes in permanent rotation around here!

December 20, 2011

TWD- Apple Pie and Classic Brownies

 Oh I can't believe Tuesdays with Dorie is coming to an end! I've loved this event so much, meeting new people, trying new recipes, learning new skills and gaining the confidence to tackle any random recipe. This week's assignment was a rewind- trying out an old favorite or something you didn't get to previously. Like so many of you we are busy busy this time of year, with lots of opportunities to bake and limited time to photo and blog! This week my tall man needed a treat to take to work so I made Dorie's classic brownies. I frosted them with a simple chocolate frosting and sprinkled on silver sanding sugar. I cut them into individual portions and put them in cupcake liners- they looked festive and were easy to serve out (a win win!) Of course I don't have a picture so here is a previous version as well as a link to the recipe.

Sunday I made Dorie's All American All Delicious Apple Pie for a family birthday party. I didn't want to serve anything particularly Christmas-y since it seems like December birthdays get ripped off pretty often! I used some new pie crust cutters a friend gave me for my birthday to quick and easily decorate the pie top with flowers. They were simple to use and super cute (and the ones I found on Amazon have a strawberry, I might need those eventually!) The recipe itself is perfection. I've made this pie a million times and while I think there are a few Dorie inspired recipes that are more so my favorite, this pie must be one of the true favs from the sheer number of times it's been baked. Don't miss Dorie's buttery, delicious pie crust (my husband's favorite!) I always double the recipe and freeze a couple of disks of pie crust so I can pull them out and have a delicious, homemade dessert without the time or mess.

See more of this week's Dorie recipe's here and have a very Merry Christmas. We'll be eating ham, rolls, potatoes, green beans, and all of our favorite fixing on Christmas day. I haven't decided on a dessert yet but if you have a family favorite or traditional Christmas dessert please do share- I'd love some ideas!

Good for Almost Everything Pie Dough
adapted from Dorie Greenspan

Ingredients
3 cups all-purpose flour
1/4 cup sugar
1 teaspoon salt
2 sticks very cold unsalted butter, cut into tablespoon-size pieces
3/8 cup very cold (frozen is even better) Crisco (plain, not butter flavored), cut into 4 pieces
About 1/2 cup ice water

Put the flour, sugar and salt in a food processor fitted with a metal blade; pulse just to combine the ingredients. Drop in the butter and shortening and pulse only until the butter and shortening are cut into the flour. Don't overdo the mixing—what you're aiming for is to have pieces the size of fat green peas and others the size of barley.

Pulsing the machine on and off, add 3 tablespoons of the water—add a little water and pulse once; add some more water and pulse again; and keep going that way. Then use a few long pulses to get the water into the flour. If after a dozen or so pulses, the dough doesn't look evenly moistened or form soft curds, pulse in as much of the remaining water, or even a few drops more, to get a dough that will stick together when pinched. If you've got big pieces of butter, that's fine. The dough is ready and should be scraped out of the work bowl and on to a smooth work surface. (be careful not too add too much water- if the dough looks dry after adding most of the water, pinch it with your hands to check if it's coming together, and finish combining it by hand)

Shape the dough into a disk and wrap it. Refrigerate the dough at least 1 hour before rolling. The dough can be kept in the refrigerator for up to 5 days or frozen for up to 1 month.

December 6, 2011

TWD- Bittersweet Brownies

Brownies are my favorite treat to bake. The batter (delicious!), the ease, the endless variations-  they're a bakers dream. Plus, who doesn't love a brownie (besides my non-chocolate eating husband, but he still loves the smell!) A few weeks ago I made Dorie's Bittersweet Brownies- using semi-sweet chocolate of course. This recipe, chosen by one of my favorite bloggers, Leslie, is the last brownie recipe in the book for Tuesdays with Dorie. I can't believe it! See the recipe on her blog here. Brownies make the perfect neighbor gift and there are a million types to choose from. Here are a few of my other favorites from Dorie and you can see a bunch more in my brownie category.

Come back tomorrow for another great neighbor gift idea (Chex Mix three ways) and a special giveaway from MyBlogSpark!

Classic Brownies (four ways)

Brownie Buttons

York Peppermint Brownies

Katharine Hepburn Brownies

French Chocolate Brownies

 Quintuple Chocolate Brownies

November 8, 2011

TWD- Honey Cherry Scones

A couple of weeks ago we were dying of heat and feeling bad that the AC would still kick on. Suddenly, it's cold- really cold! My mommy brain doesn't do so great on dates lately and last night I realized I hadn't made my Tuesdays with Dorie recipe. Sure enough, I didn't have the ingredients or the equipment for this weeks recipes so I hopped back to last week's Honey Nut Scones. The kitchen was cold and everyone was snacky (someone needs to go to the grocery store already...) so we happily turned on the oven and whipped these scones up. Using honey, whole wheat flour, and nuts (or in my case, dried cherries) they felt like a pretty decent treat.

I didn't used to like scones but now I know better! You don't need any special equipment or ingredients and the recipes are flexible. They are simple to make with butter straight out of the fridge cut into a couple dry ingredients. Pour over some wet ingredients, stir in your favorite mix ins and press into a cake pan. Normally I shape my scones with a biscuit cutter but after I read the tips from the rest of the TWD Bakers, I decided to try pressing them into the pan, cutting them like a pizza (only half way though!) and freezing them while the oven got hot. After they baked, I cut the wedges the rest of the way and the final product was fluffy and light, even with all the whole wheat flour. Obviously they were gobbled up quickly (no time for fancy pictures or good lighting at our house!) While these are still technically a pretty sweet treat (especially when topped with butter and jam), the simple, wholeness of it all felt pretty good on a cold night. You can see the recipe at Jeannette's or buy Dorie's wonderful book already. Mine is tattered and stained and I love it more every day.

October 25, 2011

TWD- Peach Cobbler

As I write, the window is open, the kids are running in and out of the house, and we've eaten pumpkin cookies all morning. It started on the blogosphere ages ago but Fall has finally come to Arizona. This is my favorite time of year and I look forward to baking and cooking without worrying about heating up my already hot kitchen! When I opened up my Baking book for this week's Tuesdays with Dorie recipe, my little man immediately said "This looks pretty Mommy!" It was gorgeous but I didn't have figs or cornmeal or the will to take both of my little monkies to the grocery store during the witching hour. So instead, I'm sharing (a little late, don't mind me) a previous TWD recipe I didn't post because it screams fall to me and is one truly worth sharing.

The recipe is called the "Upside Down Plum Cake" and after I baked it, I realized it tasted exactly like a perfect homemade peach cobbler. Before I became a crazy baker, I used to dump fruit in a baking dish, top it with a yellow cake mix, and dot the top with butter. The end result was delicious and our typical peach cobbler. This recipe is a little different. You melt the butter in the pan (while the oven is preheating, genius!), pour in the batter, and top it with the fruit. The fruit ends up on the bottom and the tender cake on top. It's simple and delicious, totally flexible and a keeper. I know peaches are about done but I'm going to try this again with apples and berries and whatever else I can get my hands on (and I think you should too!) You can see the recipe here at Becky's blog as well as the rest of the TWD crew here. Please forgive my quick pictures but the entire family was dying to eat this.

Do you have any favorite fall desserts? This one is bound to become a tradition for us!

October 11, 2011

TWD- Basic Biscuits

Have you ever watched Alton Brown's Good Eats Biscuit episode? It's a total crack up and features Alton and his grandma in a biscuit bake off, his science and technique against her traditions. The end result is that both made delicious biscuits. In the southwest, I think it's more likely that you have a special homemade salsa recipe than family biscuit style. Maybe that's just our family. I remember my mom making Bisquick biscuits and cutting them out with a glass. For her, a biscuit (along with most carbs) is "a vehicle" to gravy, butter, jam, whatever. We aren't picky about them around here and after a week of sick kids, I looked forward to a simple Tuesdays with Dorie recipe.

I let my little man do the measuring, mixing, and rolling of these biscuits. He loves using any cookie cutter and while I tried to follow Alton's advice to push straight down and not maul the biscuits, I'm not sure that was quite the case. My biscuits were a little short but they were a lot delicious nonetheless. We ate them all right off the pan with a little butter and homemade raspberry jam my mom and I made a few weeks ago. Baby Strawberry had the biggest jammy smile, my little man was proud of 'his' biscuits, and Mr. Carbohydrate polished several off before I even took a picture. You can see the recipe here or in Dorie Greenspan's awesome Baking from My Home to Yours. This recipe might be basic but it's a winner at our house.

Speaking of winners, I'd like to thank everyone who entered the Sam's Club and General Mill's giveaway from MyBlogSpark. I was touched by the comments and all the things people do to fight cancer. Together I really think we can make a big difference- thank you guys for the inspiration! The winner of the $25 Sam's Club giftcard is number 6- Holly! Get me your address asap and I'll have your prize sent out!

Come back tomorrow for a special recipe featuring Ghiradelli Intense Dark Chocolate (also benefiting breast cancer research, check it out!)

September 12, 2011

TWD- Classic Brownies

{printable recipe here}

Tuesdays with Dorie is one of my favorite parts of the blogosphere. I anticipate the monthly recipe selection and love pulling out my butter splattered copy of Baking, knowing that whatever I end up making will be delicious, as well as seeing everyone's creative take on these great recipes. I was thrilled to get a chance to host another week and happy to discover that there was still a brownie recipe available to choose. Brownies are one of my favorite treats to bake and eat (you can see lots more here) so I figured the 'Classic Brownies' were a perfect choice.

Since I can't leave well enough alone, I tripled the batch and after mixing it up, divided the batter into four smaller pans. Each recieved a different flavoring- Peanut Butter Chocolate Chip Swirl, Pecan, White Chocolate, and Oreo (I actually used Vanilla Bean Joe Joe's from Trader Joe's). The four dishes lined up perfectly on my cookie sheet.

After cooling, the brownies popped right out of the pan and my favorite knife made quick work of dividing them up. I plated them up on a huge platter and let people pick their favorites (oreo went fastest). Next time I'll give these the BYU Brownies treatment and put some mint frosting and chocolate ganache on top. I know the last thing these delicious little brownies need is more sugar, butter, and chocolate, but like Ina says, 'How bad can that be?'

 Sometimes it's hard being a food blogger's daughter! Poor baby strawberry was NOT happy to wait for these brownies but even after she downed one she was crying again, this time for more! Thanks for baking along with me (you can see the rest of the brownies here)- I hope you enjoyed this recipe and can't wait to see how everyone made these their own. And for friends close by- I have a nice little pile in the freezer. Stop by anytime (though I think my little man took the last peanut butter swirl!)

PS Did you know you can get $20 worth of groceries at Whole Foods for $10 today only from Living Social? Think of the baked goods you could make... yum!

Classic Brownies
from Baking From My Home To Yours by Dorie Greenspan, page 88
{printable recipe here}

5 tablespoons unsalted butter, cut into 5 pieces
4 ounces bittersweet chocolate, coarsely chopped (note- I used Semisweet but I think even milk would be good, whatever you have on hand!)
2 ounces unsweetened chocolate, coarsely chopped
3/4 cup sugar
2 large eggs
1 teaspoon pure vanilla extract
1/2 teaspoon instant espresso powder (optional, but really good)- note- I left this out and doubled the vanilla
1/4-1/2 teaspoon salt (according to taste- I used the full amount to bring out the chocolate flavor)
1/3 cup all-purpose flour
1 cup chopped walnuts (I used pecans- yum!)

Getting Ready: Center a rack in the oven and preheat the oven to 325 degrees F. Line an 8-inch square pan with foil, butter the foil and place the pan on a baking sheet.

Set a heatproof bowl over a saucepan of simmering water. Put the butter in the bowl, top with the chopped chocolates and stir occasionally until the ingredients are just melted - you don't want them to get so hot that the butter separates. Remove the bowl from the pan of water.

With a whisk, stir in the sugar. Don't be concerned when your smooth mixture turns grainy. One by one, whisk in the eggs. Add the vanilla and give the ingredients a vigorous whisking before gently stirring the espresso, if you are using it, salt and flour; stir only until incorporated. Switch to a rubber spatula and fold in the chopped walnuts.

Scrape the batter into the pan and smooth the top with the spatula.

Bake the brownies for 30 to 33 minutes, or until the top is dull and a thin knife inserted into the center come out clean. Transfer the pan to a rack and cool the brownies to room temperature.
When the brownies are completely cool, turn out onto a rack, peel away the foil and invert onto a cutting board. Cut into 16 squares, each a scant 2 inches on a side.

Serving: Like all great brownies, these are good eaten out of hang without a bit of embellishment or topped off with whipped or ice cream (coffee ice cream is really good with these), offered either way at room temperature or a bit chilled.

Storing recommendations: These are best served within 2 days of baking. If you're going to keep them at room temperature, just cut what you need and keep the remainder wrapped tightly in plastic wrap. To freeze for up to 2 months, wrap the brownies airtight.

September 6, 2011

TWD- Chocolate Peanut Butter Whoopie Pies

Is there a better combination than chocolate and peanut butter? Just looking at these pictures has me drooling and wishing I had saved more of these cookies for our own cookie jar, although I know giving them away was the wiser choice. This week's Tuesdays with Dorie recipe is really late but when I looked through my folder and realized I'd missed posting these in the crazy of summer, I knew it was time!

Dorie describes these as 'thin and plain' but they turned out much different for me- fluffy, flavorful, and almost cute. I used a small-ish metal cookie scoop to portion out the dough nicely and will use and even smaller one next time to make tiny little whoopie pies. I think you could really use any flavor filling to compliment the chocolate (mint, raspberry, orange, caramel?) but the second I tried one out of the oven of these I had Barefoot Contessa's peanut butter frosting on the brain. It was a delicious combo as long as you didn't think too much about how much rich, delicious stuff heads into that icing! Thanks Spike for getting me out of my comfort zone so I could discover another new favorite.

See this weeks real recipe here. I've included my recipe with the changes below as I omitted the spices, fruit, and worked with what I had. I'm sure any way you make them they would come out great (once again, butter, sugar, flour, chocolate, how bad can that be?)

Whoopie Pies with Peanut Butter Filling
adapted from Dorie Greenspan's wonderful Baking

2 1/4 cups all-purpose flour
2 tablespoons unsweetened cocoa powder
1 teaspoon baking soda
1/2 teaspoon salt
1/2 stick (4 tablespoons) unsalted butter, softened
1 1/4 cups dark brown sugar
1/2 cup sugar
2 large eggs
2 teaspoons pure vanilla extract
2 ounces unsweetened chocolate, melted and cooled (or bittersweet was fine for me- work with what you have!)
1 cup sour cream

Getting Ready: Position the racks to divide the oven into thirds and preheat oven to 375. Line two baking sheets with parchment or silicone mats.

Whisk together the flour, cocoa, baking soda, and salt. Working with a stand mixer, preferably fitted with a paddle attachment, or with a hand mixer in a large bowl, beat the butter on medium speed until it is creamy and smooth.  Add the sugars and beat for two minutes or so, then add the eggs one by one.  Beat for another minute-the mixture should be smooth and satiny.  Reduce the mixer speed to low and mix in the vanilla and melted chocolate.  With the mixer still on low speed, add the dry ingredients and the sour cream alternatively, adding the dry ingredients in 3 batches and the sour cream in 2 (begin and end with the dry team). Do not overmix and be gentle!

Drop the batter by heaping teaspoonfuls onto the baking sheets, making certain to leave at least an inch between the spoonfuls. Note- if this is difficult, try chilling the dough for a few minute in the fridge! Bake for 12-15 minutes- the cookies will puff, spread and round themselves out in baking.  They’re done when they are set on top but still springy to the touch.  Pull the sheets from the oven and let the cookies rest for 1 minute, then, using a wide metal spatula, carefully transfer them to a rack.  Cool to room temperature.
Repeat with the remaining batter, making sure to cool the baking sheets between batches.

Storing: Because these are soft, they are best stored loosely stacked in a tin with wax paper between the layers.  They can be kept at room temperature for about 4 days or packed airtight and frozen for about 2 months.

Kathleen's Peanut Butter Icing
adapted from the lovely Ina Garten (aka Barefoot Contessa)

1 cup powdered sugar (I added an additional 1/2 cup for a total 1 1/2)
1 cup creamy peanut butter
5 tablespoons unsalted butter, softened
1 1/2 teaspoons pure vanilla extract
1/4 teaspoon kosher salt
1/3 cup heavy cream

Place the powdered sugar, peanut butter, butter, vanilla, and salt in the bowl of an electric mixer fitted with a paddle attachment. Mix on medium-low speed until creamy, scraping down the bowl occasionally. Add the cream and beat on high speed until the mixture is light and smooth.

Spread frosting between cooled cookies and enjoy (guess what- they are even better the next day, yay!)

August 23, 2011

TWD- Brioche


This TWD recipe is particularly nostalgic as it's one of the first I made from the book. I remember being a little nervous making it myself and especially nervous once I saw how hot my beloved KitchenAid was getting! I carefully held frozen veggies to the mixer and prayed she would be alright. I'm sure that wasn't remotely effectively but she's lived to mix many more batches of deliciousness and the brioche raisin snails (a favorite recipe to this day) were amazing. My husbands favorite Dorie remains the pecan honey sticky buns. You can't go wrong with brioche it appears.

I've posted the recipe before so I'll include it again. It's so easy to be intimidated by 'fancy' treats that end up being not nearly as difficult as I'd thought before. You can also see the recipe over at Tea and Scones (thanks for the awesome choice!)

By the way- a sweet friend helped me switch over to my own domain last night (I've only owned it for two years and done nothing... lame). If there's any hiccups please excuse them, but you should be able to get straight to AnneStrawberry.com now from my old blogspot address. Yay!

Golden Brioche Loaves (see the brioche raisin snails and pecan honey sticky buns here)
2 packets active dry yeast (or about 2 1/2 teaspoons per packet)
1/3 C. just-warm-to-the-touch water
1/3 C. just-warm-to-the-touch whole milk
3 2/3 C. all-purpose flour
2 teaspoons salt
3 large eggs, at room temperature
1/4 C. sugar
3 sticks (12 ounces) unsalted butter, at room temperature but still slightly firm

To Make The Brioche: Put the yeast, water and milk in the bowl of a stand mixer and, using a wooden spoon, stir until the yeast is dissolved. Add the flour and salt, and fit into the mixer with the dough hook, if you have one. Toss a kitchen towel over the mixer, covering the bowl as completely as you can-- this will help keep you, the counter and your kitchen floor from being showered in flour. Turn the mixer on and off a few short pulses, just to dampen the flour (yes, you can peek to see how you're doing), then remove the towel, increase the mixer speed to medium-low and mix for a minute or two, just until the flour is moistened. At this point, you'll have a fairly dry, shaggy mess.

Scrape the sides and bottom of the bowl with a rubber spatula, set the mixer to low and add the eggs, followed by the sugar. Increase the mixer speed to medium and beat for about 3 minutes, until the dough forms a ball. Reduce the speed to low and add the butter in 2-tablespoon-size chunks, beating until each piece is almost incorporated before adding the next. You'll have a dough that is very soft, almost like batter. Increase the speed to medium-high and continue to beat until the dough pulls away from the sides of the bowl, about 10 minutes.

Transfer the dough to a clean bowl (or wash out the mixer bowl and use it), cover with plastic wrap and leave at room temperature until nearly doubled in size, 40 to 60 minutes, depending upon the warmth of your room.

Deflate the dough by lifting it up around the edges and letting it fall with a slap to the bowl. Cover the bowl with the plastic wrap and put it in the refrigerator. Slap the dough down in the bowl every 30 minutes until it stops rising, about 2 hours, then leave the uncovered dough in the refrigerator to chill overnight.

For complete directions for the Brioche Raisin (or in my case Chocolate) Snails or the Brioche loaves, check out these previous posts.

August 9, 2011

TWD- Carrot {Cake} Muffins

Does anyone really know the difference between a muffin and a cupcakes? My favorite part of either is the frosting so... when I read this week's Tuesdays with Dorie recipe (Carrot Muffins) I knew I would have to include the cream cheese frosting. I was out of coconut (bleh!) so I added a little oatmeal instead.

With the spices, pecans, Craisins, and frosting- these were the best carrot cupcakes muffins I've ever made. They came out with the perfect rise (flat muffins kind of bother me!) and took only a couple minutes to whip together. Don't forget to use paper liners to remove the muffins easily and to set the muffin tin on top of a cookie sheet to keep bottoms from burning (no one likes that!) You could easily sub in half whole wheat flour and no one would be the wiser- then you might not feel as guilty topping your muffins with cream cheese frosting! See the recipe at Nancy's awesome blog here or buy the book on Amazon.

August 2, 2011

TWD- Cocoa Almond Meringues


Are you having a lovely summer? We've been relaxing and doing all sorts of super important things like hanging out with our friends, going to swimming lessons, eating popsicles, going to the movies, and folding laundry (never a vacation from that!) It's ridiculously hot right now. So hot, I can count on one hand the number of times I've turned on the oven in the last month- that's a new record for me. I did a couple marathon Tuesdays with Dorie baking sessions at my mom's and, you know, with our busy schedule didn't even post them. Maybe later. Ahem.

 
These meringues take just a minute or two to whip up- nothing time intensive, no weird ingredients, no slaving over the stove. I ground the almonds in the food processor with some of the powdered sugar, pulsed in the cocoa powder, whipped the egg whites, folded in the dry team and the chocolate, and we were good to go. A little time on 300 then an hour on super low heat and we were eating these babies right out of the oven.

Before I fancied these guys up with some melted chocolate and chopped almonds, I tried to snap a quick picture. Two adorable blondies emerged from the sandbox and quickly attacked these 'chocolate cookies'. With their crunchy outside, sweet soft inside, and great flavor combo I couldn't blame them- Dorie wins again! These are even gluten free for my wheat-free friends (pretty awesome!)

Please come back tomorrow for the Wednesday Want and check out Mike's awesome and funny blog to see the recipe and the rest of the TWD crew here.

July 12, 2011

TWD- Chocolate Chip Scones


Can you believe I actually made this week's Tuesdays with Dorie recipe on time? I had a marathon baking session at my mom's last week and got a lot accomplished after my mom kindly pointed out that I was a total slacker and asked if anyone was still reading my blog. Thanks for reading, by the way. Anyways, these scones were a cinch to throw together and to satisfy my best customers I added mini chocolate chips. I halved the recipe and these were eaten up in no time. Even my mom, who doesn't like scones, said, "These are actually good, well, for scones." Another simple and delicious success thanks to Dorie. See the recipe at Lynne's beautiful site. Thanks for the great choice!

July 6, 2011

Chocolate Chip Muffins

What is the difference between a cupcake and a muffin? I'm sure it's something to do with the mixing method and the ratio of ingredients, but when I ate one of these this morning I felt like I was eating chocolate cake without the frosting for breakfast. In fairness, I did up the chocolatey flavor by included extra chocolate chips throughout the batter and on top and by using half Hershey's Special Dark cocoa powder along with the regular stuff.This week's Tuesdays with Dorie choice worked out perfectly. The only problem I had with the recipe was photographing these little guys (every time I left them alone I ended up with at least one less muffin!) I'm sure my kids didn't mind the chocolate for breakfast dilemma.

Since today is a Wednesday Want day, I thought I would show some of my favorite tools for making muffins and what I actually used to make these last night. It didn't take many dishes or any out of the ordinary ingredients (for me, that means sour cream... I'm always borrowing it from the neighbors!) You don't even need a beloved KitchenAid for muffins!

1}. Medium Mixing Bowl (mine is similar to this set from Trudeau, via Sam's Club a few years ago)

2}. Microwave Safe Bowl (to melt the chocolate and butter together- I used my basic Corelle)

3}. Liquid Measuring Cup- I have a 1, 2, and 4 cup and at least one is always in the dishwasher. For this recipe, I skipped the buttermilk and just soured some milk with a teaspoon or so of vinegar in my measuring cup. Then I mixed in the rest of the liquid ingredients and poured it right over the dry to save a separate dish.

4}. Measuring Spoons (mine are from Target but I prefer the long skinny ones from Williams Sonoma- they would fit in any spice jar)

5}. Measuring Cups

6}. Large Silicone Spatula to gently mix it all together- I used to be in love with the KitchenAid ones (they're really affordable at Target, Ross, or TJ Maxx and come in a million colors to match your mixer) but prefer this Le Creuset Super Spatula I got from CSN Stores.

7}. Cookie Scoop- perfectly portioned batter every time. And I never use these for ice cream, though I know they are intended for that...

8}. In classic "do as I say, not as I do" fashion, I'd recommend sifting any time a recipe calls for cocoas powder. The final product will be smoother and the cocoa will be much better distributed.

I guess it turns out to a decent list, but I think most of you have a lot of this stuff already. With these tools and a light hand, quick and delicious muffins are in anyone's grasp. See the recipe for Dorie's Chocolate Muffins on Bridget's Blog here- they look gorgeous with the white chocolate chunks and colored muffin liners!

June 21, 2011

TWD- Chocolate Biscotti

Tuesdays with Dorie is such a great excuse to try new things. I'd never tried biscotti before but needed to catch up so I made this recipe anyways: I figured the coffee drinkers at my tall man's work would appreciate these crunchy cookies so I went ahead. As usual, I was pleasantly surpised and LOVED these cookies. I don't know about you, but I don't really need to expand my unhealthy-treats-I-love repoiretoire but what can you do? Baby Strawberry and I loved dunking these in a cold glass of milk.

See the recipe here from Jacque- and check out her beautiful process pictures if you need a little help visualizing the cookie shaping procedure like I did or on you can find the recipe on Peabody's. You can also see all the biscotti from the rest of the group or this week's Date Nut loaf. And as always, I recommend buying Dorie's awesome book. It never ceases to amaze me how many things I've learned to like by trying so many of her recipes (what's next, coconut? Running? I wouldn't put it past Dorie!)

Notes on the recipe: I omitted the espresso powder and added some Hershey's Special Dark cocoa in the same amount. I also used cashews and mini chocolate chips for the add ins. Last, I sprinkled a little bit of salt on top with the sugar and the salty kick was subtle and wonderful!

To shape the biscotti, I just divided the dough into two and made two logs on either side of the silpat lined cookie sheet (if this were art class I would say to divide the paper 'hot dog style') then when it's time to cut them, just lay them out the same way again but each cookie on their side. Much easier than I imagined!

June 7, 2011

TWD- Caramel Pots de Creme

 
Did you miss me? Remember how I said I was back and would queue up some posts? We'll, you know what they say about good intentions. I am happy to report that my brother's wedding was wonderful and I got all the things baked in time that I needed to (come back for the Wednesday Want to see the engagement ring sugar cookies and one of the most important tool I needed to get everything done, besides my wonderful, helpful friends!)

So back to Tuesdays with Dorie. I made these Caramel Pots de Creme in hearts in John's honor last week but had a little date mix up so here I am on this Tuesday with them (see their blueberry brown sugar cakes here). Next time I make these I will try the chocolate flavor (yum!) and add salt again. I will also strain the custard before chilling since you never know and the texture is really important in these delicious little French custards. The ingredients are simple and you don't really need any extra equipment. I'd encourage you to give them a try- and watch the caramel carefully, I think mine was just over the edge, but we still enjoyed these. See the recipe from the wonderful Peggy  or buy Dorie's amazing book already and give them a try yourself. They have a fancy Frenchie name but it's really worth trying something new and with a little patience anyone can do it!

May 10, 2011

TWD- Apple Cherry Brown Sugar Bundt Cake


My husband always asks, "what's the Dorie treat?" and kind of tunes out, expecting chocolate. When I started with the words "brown sugar" he perked up instantly and was patient and helpful while I worked. The batter comes together quickly and is as simple as a batch of cookies. As for variations, I used half freshly ground white whole wheat flour (no one noticed) and omitted the nuts, adding apples, dried cherries, and a little cinnamon instead. The house smelled wonderful while I waited for it to bake and I had vision of beautiful bundts on lovely platters (a la Food Librarian) but when I finally unmolded it, it stuck in all the fruity places (despite all my careful Pam with Flour application!) Nonetheless, the cake lived up to the smell and was wonderful. I can't wait to make it again and will see if I can't get away with a little less butter and a little more whole wheat flour. See the recipe at Peggy's or buy the book already, it's worth every penny (and calorie!)

May 3, 2011

TWD- Chocolate and Peppermint Marbled Loaf Cake

This week's Tuesdays with Dorie treat was a real winner at our house. I used a smaller loaf pan so I made a mini loaf as well and left one with my parents and took the other home. By the time I had it cut and took a couple of pictures, my kids had each swiped a piece or two. It never made it from cutting board to plate but everyone loved it. After naps, my little man walked out and asked for a piece of "chocolate bread" and was very upset to hear we'd given the last piece away. That was my biggest problem with this recipe- it was eaten far too fast and was deceptively guiltless (hence the "chocolate bread" nickname). There's way too much butter to count this as decent breakfast fare but I'll admit it was a lovely breakfast. We loved the peppermint version (made by dividing the batter and adding melted white chocolate to one portion and melted chocolate and peppermint extract to the other). Dorie suggests several wonderful variations and I can't wait to try a raspberry key lime cake next time. See the recipe here and try the batter (it might have been even better than the amazing cake!)

April 26, 2011

TWD- Apple Tart Handpies

{printable recipe here}
Yesterday I went to make the cornmeal shortbread cookies for TWD and realized I had no cornmeal! I still needed to make the tourtley apple tart so I decided that would have to do, so I set about making the pastry (nut free for Baby Strawberry). I pulled out one of my prized jars of homemade applesauce, since Dorie's description of the apple filling sounded so similar. My friend's grandma always made the best applesauce, spiced with cinnamon, mashed only a little to yield a thick, chunky, fragrant treat. I just can't eat any other kind now (though I'll admit I do buy the huge jars of Treetop at Costco for the kids!)

Last summer my thoughtful best friend Kara gave me several bushels of tart apples from her parents' tree. My mom and I made batch after batch of applesauce and apple pie filling to last all year with her steam canner. It's the only thing I've really canned before but it's not that intimidating and so rewarding. I only have a few jars left and can't wait for apple season to come again. If you haven't made applesauce before, I'd encourage you to try it soon. It's really not that time consuming with the apple peeler tool and the end product is so rewarding. Next time you have several apples languishing in the bottom of the fridge give it a try and let me know that I'm not the only person that's high maintenance about something as trivial as applesauce!

When it came time to shape the tart dough, I realized my mini tart pans were at my mom's, so I used my little dumpling press to make these hand pies. I bought a set at Ross several years ago (similar to this one) and they don't take up much room in the pantry and work really well for handpies. My husband loves the crust to filling ratio, too. While I certainly heavily deviated from the intended recipe, the flavors are the same and they are absolutely wonderful.  Even better, it all came together in just a few minutes. Thanks Dorie for the inspiration and Jeannette for the recipe choice!

 
Gram McGrath's Apple Sauce (the only kind Anne Strawberry will eat)
from Anne Strawberry
{printable recipe here}

8 Apples (I prefer the tart/firm varieties, but whatever you have on hand will work)
1 Cup Water
1/2 - 2/3 Cup Sugar, depending on the sweetness of the apples
2/3 Teaspoon Cinnamon

Peel, core, and slice the apples (I use my handy apple peeler/slicer to make quick work of this job, even my little man can do it).

In a large saucepan (or a big stockpot if you're doubling the recipe, I usually do) combine the apples, water, and sugar. Simmer until soft (about 15-20 minutes) and mash with a potato mashed- don't drain! Add cinnamon, stir, and eat warm.

April 12, 2011

TWD- Strawberry Apple Double Crisp

Strawberry Apple Double Crisp{printable recipe here}
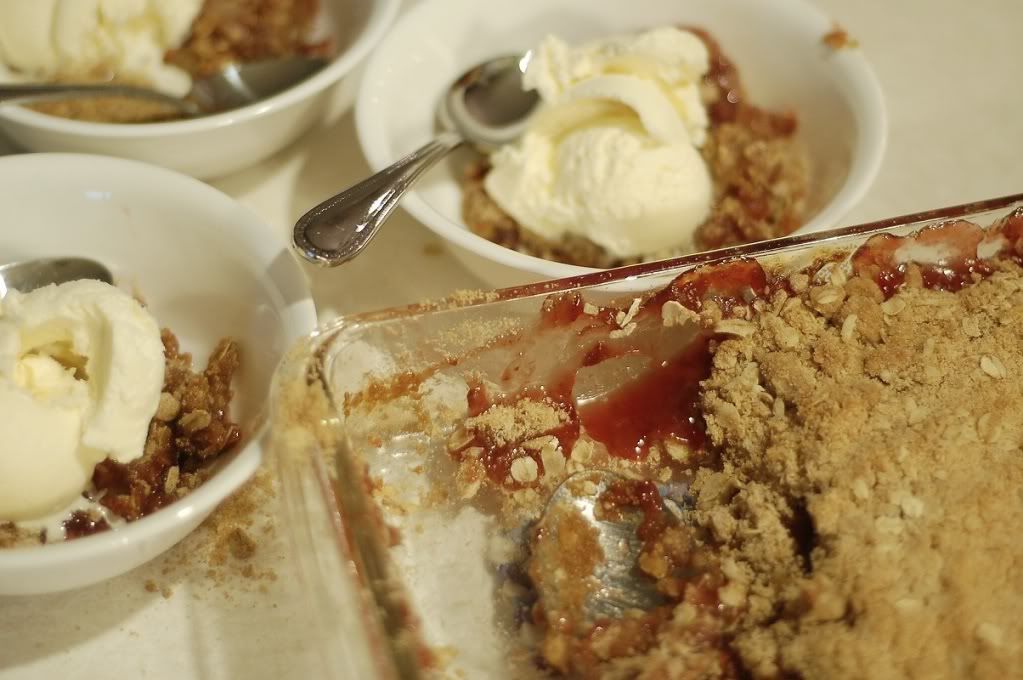
My husband, Mr. Carbohydrate himself, loves fruit crisp in any variety so I knew this week's Tuesdays with Dorie treat, Strawberry Rhubarb Double Crisp would be a hit. Of course I've never made anything with Rhubarb (am I the only one?) and there's none at the store- so I subbed in an easy favorite- apples. They're cheap, delicious, and easy to prepare using my favorite apple slicer and peeler. Strawberries are barely in season and still way too much money so I used some that I had sliced and frozen last summer instead of fresh.

Then I catered to the needs of the group- no nuts, no ginger (fine, that was my doing), and extra cinnamon. A little less sugar in the filling, a little extra citrus, and this crisp was the real deal- even if it was nothing at all like Dorie intended.You could easily sub in different fruit (maybe cran apple next time?) and spices and the end product will be great- you know, butter, sugar, fruit, how bad can that be? Just don't forget the ice cream and come back tomorrow for the Wednesday Want! You can see my loosely based version of the recipe below or the real deal from Sarah here.

Strawberry Apple Double CrispAnne Strawberry Apple Double Crisp
{printable recipe here}
adapted from Baking by Dorie Greenspan

For the Filling:
3 tablespoons cornstarch
1/2 cup cold water
3 cups strawberries, hulled and sliced (about 1 pound)- frozen is fine too
3/4 cup sugar
1 teaspoon vanilla
5 medium apples (pink lady, granny smith, something crisp)
1/2 teaspoon orange zest
zest of half an orange (about a quarter cup)

For the Crisp:
1 cup flour
1 cup dark brown sugar, packed
1 cup oats
pinch of salt
1/8 teaspoon cinnamon
1 stick (1/2 cup) butter, melted and cooled

Preheat the oven to 350. Set a baking dish (I used a medium rectangular pyrex, something around 9 x 9 or 7 x 11) on top of a baking sheet.

Stir together the water and cornstarch and set aside to dissolve. In a medium saucepan, combine the strawberries and sugar. Using a fork, wooden spoon, or potato masher, cook the strawberries over medium heat, while stirring, until the mixture comes to a boil. Whisk in the cornstarch mixture and bring it back to a boil. Cook for 2 or 3 minutes until the filling is thick and turns clear. Stir in the vanilla and set aside while you prepare the apples.

Peel and slice the apples into halved, 1/2 inch thick wedges. Toss with orange zest and juice and set aside.

To prepare the crisp- combine the flour, sugar, oats, salt, and cinnamon in a large bowl and blend with your fingers. Pour over the melted butter and gently combine ingredients with a fork.

Put half the crumbs into the bottom of the pan and pat down to make a crust. Pour in the apples and pour over the strawberry filling. Smooth the jam and evenly sprinkle over the rest of the crumb mixture. Bake for 50-60 minutes, until slightly browned, bubbly, and fragrant. Allow to cool for five or ten minutes and serve warm with ice cream.

March 29, 2011

TWD- Mexican Wedding Cookies

 
Things have been a little busy and stressful lately. When that happens I love to tackle a good project- clean the pantry, paint a piece of furniture, do some over the top recipe, try to paint Baby Strawberry's toenails (that one ended with 'Redipus Oedipus' all over my bath tub and my new top coat bottle shattered on the bathroom floor, remind me to cross baby pedicures off the "relaxing a little Anne" list!) When I make a huge mess and dedicate a lot of time to a project, it makes me feel better (especially after it's all cleaned up). So last week for Greek Independence Day, on top of the regular dishes, I decided to make homemade pitas and herb feta stuffed rolls. And then some key lime pie. There was a lot of mess and a lot of distraction (thanks for the help and the company, Lauren!) That said, I love a quick and easy recipe- and some days that's exactly what I need. These "Pecan Powder Puffs" as Dorie calls them come together in the food processor, with regular pantry ingredients. I'm not normally a huge fan of these cookies but Dorie did it again and changed my mind. They're sandy and light, flavorful and bite size (my little man loves that). Pretty awesome. I've liked "not liking" certain desserts and knowing I wouldn't be tempted, but Dorie keeps expanding my horizons (that didn't necessarily need expanding!)

Give this recipe a try- you can see it over at Buttercream Barbie or in the fabulous Baking by Dorie Greenspan. You never know what you might end up liking!

PS Come back tomorrow for the first "Wednesday Want"!