May 30, 2010

Cherry Cheesecake Cobbler

Photobucket
{printable recipe here}
Whew! There hasn't been much content around here and that's because we've been eating chicken noodle soup, gatorade, and toast. Yes, the flu found us (which is funny because we dodged it all winter only to succumb once it's 100 degrees here)- even poor little Baby Strawberry. We're better now, thankfully, and
that means more baking.

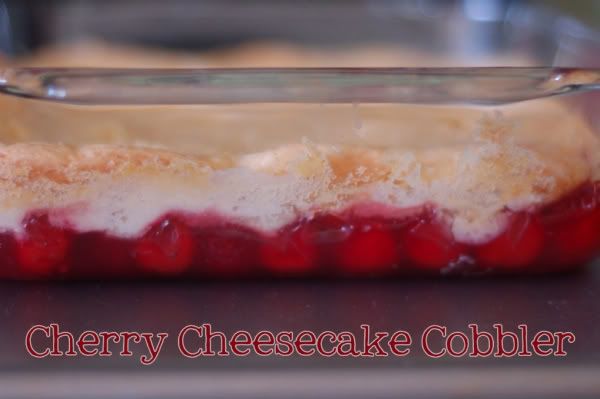
The nice people at Lucky Leaf contacted me and asked if I wanted to test their pie fillings (of course I couldn't decline, they're high quality and made with great ingredients! And my Tall Man loves pie, so it was a win win. And by the way- did you know you can buy pie filling on Amazon? They really do have absolutely everything). I couldn't stop thinking about cobbler and then I thought, "If I love cheesecake brownies so much, why not cheesecake cobbler?" So, thinking like brownies, I made a some cheesecake filling and swirled it into the topping. It tastes great but I was really disappointed when you couldn't see the swirls after it finished baking. Next time, I'm going to try adding two cans of filling- because it was really, really great- and swirling the cheesecake into that so the effect is better. In that case, I would do this the old fashioned way- sprinkle the cake mix over the filling and dot with butter. Bake and enjoy. Either way, this is long gone around here and my little man especially loved it. Hope you have a great Memorial Day weekend and get your summer off to a good start! Let me know what your favorite "summer" food is. A few days out of the kitchen was enough for me- I'm ready to go!

Photobucket

Cherry Cheesecake Cobbler
from Anne Strawberry
{printable recipe here}

2 Cans Lucky Leaf Premium Cherry Pie Filling

For the Cheesecake:
1 stick softened Neufchatel Cream Cheese
1 Tablespoons Vanilla
1 Egg
1/4 Cup Sugar
2 Tablespoons Flour

Combine all ingredients and mix until nice and smooth (about one minute on high in the KitchenAid).

For the Topping:
1 Yellow Cake Mix (I always buy Betty Crocker)
1/2 Cup (1 Stick) Butter. chopped into bits


Combine all ingredients and mix until incorporated (about one minutes with a whisk, nothing fancy here!)

Preheat the oven to 350. Spread both cans of pie filling over a greased 10 x 13 pan. Drop large spoonfuls of the cream cheese mixture evenly over the filling and cut through with a knife to swirl, dragging the cheesecake through the filling until you like the look. Sprinkle the cake mix over the top and dot with butter. Bake until bubbly and starting to brown (about 25-30 minutes in my oven).

May 24, 2010

Zucchini Bread

Photobucket

{printable recipe here}
I have the best brother in the world but he's far from adventurous when it comes to food (he lived in Greece and never learned to like olives, seriously!) So, when I was "helping" my mom use up her zucchini before it went bad, I actually had to lie to my wonderful brother. "What are you making?" "Zucchini bread" (Oh crap, I realized he would never eat it, why had I said that?) "Sick! It doesn't have zucchini in it really, right?" "Yeah, it just has some green food coloring and is called that." Whew. I hid my bowl of shredded zucchini under a dish towel and it went undetected. When the bread and muffins were out of the oven he actually tried them. And guess what? He liked them, after all, it is crazy delicious. And how couldn't it be? This stuff has so much sugar in it I don't know how you can actually call it a bread! Thank goodness zucchini isn't cheap year round...and I'll look into a less sugary recipe but I can verify that this was definitely an easy, delicious way to go. I got the recipe from my mom's best friend Barb, who's from Utah- they know how to handle extra zucchini up there! She's an amazing cook and her husband does ALL the dishes, too. Apparently she knows how to handle her man, too! ;)

Check out my little budding food photographer below. While I was taking pictures he ran in and made me wait while he snapped a few.

Photobucket

Anne Strawberry's New Favorite Zucchini "Bread"
{printable recipe here}
from Barb Sperry

3 eggs
1 cup oil
2 cup sugar
2 cups grated zucchini
1 Tbsp vanilla
3 cups flour
1 Tbsp cinnamon
1 tsp salt
1 tsp baking soda
¼ tsp baking powder
½ cup chopped nuts

Preheat the oven to 325. Beat eggs until foamy (about 2 minutes in the stand mixer). Add oil and sugar and mix until incorporated. Add zucchini and vanilla. Blend. Add all dry ingredients and nuts and mix until just barely combined (do not overbeat or it will get tough).

Bake in greased mini loaf pans at 325 for 40-50 minutes or as muffins (about 30 minutes) or mini muffins (about 20-25 minutes). (Note- these times are approximate, since I used mini pans and 1 1/2 of a recipe so I had a lot of batter. Watch your bread carefully while baking. Make sure it's not underdone or the bread will collapse after cooling.)

May 18, 2010

TWD- Apple Blackberry Bread Pudding

{printable recipe here}
I didn't use to like bread pudding. I have no idea where I came up with that but I held to that belief until a couple of years ago. Then I woke up and thought, really, I like every single thing in this dessert, how could I not like bread pudding? So I tried it and lo and behold, I love it! I was also quite wrong about guacamole but I hold true to my aversion to edible sunblock (you probably know it as coconut). Anyways, this was yummy. I've never made bread pudding with slices of bread but it was kind of fun. By far, my favorite part of the whole thing was the apples. I doubled them but then snitched so many while cooking I think it was a wash. Either way, in my adapted version below I included double the apples. I also used all whole milk instead of any cream since that's what was in my parents fridge when I was over and taking advantage of free babysitting while trying to get my baking in. You know how it goes.

By the way, I'm not one for *too many* kitchen gadgets but if you're staring at this and thinking what a pain it would be to cut all those apples, you should get one of these awesome apple peelers already. It's quick and fun (my Little Man LOVES helping me do this) and makes apple sauce and piece a cinch. You can also find them at Marshall's or Ross for about 10 or 12 bucks. I use mine every day to cut my apple for my oatmeal (which means I use it more often than my toaster! What can I say, if you like apple anything you need this!)

Please give bread pudding a try if you haven't in a while. I was totally wrong and love it now (especially my white chocolate raspberry version). What can I say, those childhood aversions are mighty strong! I'm not the only one with irrational food beliefs, right? Right?

See more yummy bread puddings from the rest of the Tuesdays with Dorie bunch here and big thanks to Cake Or Death for a great pick.


Apple Blackberry Bread Pudding
from Anne Strawberry
{printable recipe here}
casually adapted from Baking by Dorie Greenspan

6 apples, peeled, cored, and sliced (as you would prepare for apple pie- I use my handy apple tool)
5 tablespoons butter
5 tablespoons sugar

1 loaf of French bread, sliced 1/2 inch think (about 12-16 ounces)
1/2 cup blackberry jam
4 cups milk (I used whole since that's what I had on hand and I'm sure 2% would work but I wouldn't use skim for you crazies that buy it!)
6 large eggs
3 egg yolks
3/4 cup sugar
1 teaspoon vanilla
1 pint blackberries (frozen would be fine, too- just put in straight from freezer, do not thaw)

whipped cream (for serving)

In a large skillet over medium high heat, melt the butter. Sprinkle the sugar over the top and cook for a minute or two, until it's caramelized but not burned. Toss in the apples and cook, stirring occasionally, until the apples are tender but not too soft. Set aside.

Meanwhile, if your bread isn't stale, arrange the slices on a baking sheet and toast in a 350 degree oven for 10 minutes or so. After the have cooled a little, spread each piece with jam. Cut each piece in half or into quarters and cover the bottom of a large baking dish (I used my 9 x 13 but you can be flexible here).

Pour over the apples and spread neatly over the bread. Sprinkle with blackberries and top with the rest of the bread. Set aside.

Bring the milk to a boil. Whisk together the eggs and 3/4 cup sugar. After well combined, slowly pour in a little milk while whisking to tempter the eggs. Slowly pour the rest of the milk in and then whisk in the vanilla. Spoon off any foam from the custard then pour it all over the bread, pressing the bread gently to help it soak in all the deliciousness. Let the custard sit on the counter for about 30 minutes.

Preheat the oven to 325. Bake for about 1 hour, until a knife comes out mostly clean. Let cool for a few minutes and serve with ice cream or whipped cream (add caramel sauce if you're feeling fancy!)

May 14, 2010

Chocolate Mint Chippers

{printable recipe here}
I've been craving chocolate lately. On Sunday, at Church, all the women had cake and talked for the last few minutes while the men and the youth took care of every thing else, namely the kids. I was dying for a piece of chocolate cake. It was calling to me (you know that feeling right? I don't even like cake that much, either. I think it was all that chocolate frosting). Then I remembered my pastry cream sitting the fridge. Pastry cream is, to me at least, better than pretty much any other food. Sure, cheesecake or really great brownies trump that, but not by much. So I abstained. I got a piece of white cake instead and gave it my tall man (since he can't have the chocolate and I couldn't justify cake and tart both!) Well, abstinence makes the heart grow fonder or something. I've been pining for chocolate all week. Add mint and I think I'll take these over pastry cream (today at least!)

About the mint chips- I love the Guittard brand. I first tried them in Utah- super cheap at Ream's (like everything else there). Now I find the mint chips, in the pretty green bag, at my Safeway, most of the time, particularly around the holidays. You can also order them. It's totally worth it, these things are so delicious and versatile. You could also chop up York peppermint patties or Junior Mints. Same idea but more mess (though still, crazy delicious!) I'm told some people don't like mint and chocolate, in which case I'd recommend peanut butter chips. Mint holds my heart though.

If you're still in the mood for something minty...
Mint Brownies (like BYU's)
Vanilla Sandwich Cookies with Mint Filling
Mint Mini Cheesecakes
Peppermint Bark Cheesecake
Mint Oreo Cheesecake Brownies with Mint Ganache

Mint Chocolate Chippers
from AnneStrawberry (but really, like Paradise Bakery's. Yum)
{printable recipe here}

1 3/4 cups Flour (Be sure to level off- you don't want too much)
1 1/4 cups Cocoa powder (I use 3/4 cup of the regular Hershey's and 1/4 of Hershey's Special Dark)
2 teaspoons Baking Soda
1/2 teaspoon Salt
3/4 cup Brown Sugar
1 cup Sugar
1 cup Butter, softened
2 eggs, room temperature
2 teaspoons Pure Vanilla Extract
1 cup white chocolate chips (I prefer Ghiradelli but let's be honest, I use Nestle or Hershey's more often!)
1 cup Guittard Mint chips

Preheat oven to 350 degrees and prepare baking sheets (Grease or line with Silpat or parchment paper).

Sift together flour, cocoa powder, baking soda, and salt. Set dry ingredients aside.

Cream together the butter, brown sugar and white sugar until light and fluffy (about 2 minutes in the KitchenAid). Add eggs one at a time, beating well with each addiction. Add vanilla and mix once to combine.

With the mixer on low, slowly add in the dry mixture, stirring until just incorporated. Fold in white chocolate chips. Scoop onto the prepared cookie sheet and squish slightly if flatter cookies are desired.

Bake for 8 to 10 minutes until fluffy but still soft. Allow cookies to cool on baking sheet for 5 minutes before removing to a wire rack to cool completely. Serve with milk and store in an airtight container or in the freezer (if your house is anything like mine, they'll be gone long before they go bad!)

May 11, 2010

My Favorite French Tart

Photobucket
{printable recipe here}
Oh man, French tarts are one of my very favorite foods of all time. Really. I knew this week's Tuesdays with Dorie recipe would be a perfect addition to our Mother's Day Dinner. Of course by the time I made the pastry cream I realized that I did not have enough eggs! So instead of the last two yolks I just used one whole egg. I also used 2% milk since that's what I had. At this point I figured I might as well keep on so I cut a little butter. The final product? Still totally delicious. You probably shouldn't really trust me, though, because I'd eat pastry cream all day long if I could. I have to say, though, that this tart was gone in give minutes. There just wasn't time to put the glaze on top because we were so excited to eat it. Thanks for the perfect recipe choice, Cristine (find the real recipe on her blog).

Photobucket 
Hope you had a wonderful Mother's Day! I spoke in Church about my mom and motherhood and while I'm super glad it's done I appreciated the chance to think about how grateful I am to be a mother. Here's a side by side pick of my little man and Baby Strawberry (both 7 1/2 months, they sure look alike but wow there was a lot more of him to love if you know what I mean!)

One last thing... Will someone please tell my Tall Man to surprise me with this rectangular tart pan? Seriously? After reading everyone's tart posts I'm coveting one of these more than ever. I might even make him a rack of ribs in exchange- sound good?

Photobucket
My Favorite French Tart
by Anne Strawberry
{printable recipe here}

One fully baked 9 inch tart shell, recipe below
Half a batch of Vanilla bean pastry cream, recipe below
1 pound strawberries, washed, stems removed, and sliced in half (or fruit of any variety- this time I used 1 pound of strawberries, 3/4 cup blackberries, and 3 kiwis)
2 tablespoons strawberry jam
Powdered sugar, for serving

Line baked and cooled tart shell with the pastry cream, spreading evenly over the bottom of the shell. Arrange the strawberries in a pattern, squeezing in tightly.

Heat strawberry jam until warm and spreadable in the microwave or a small saucepan. Brush over strawberries to create a shiny topping. Slice and sprinkle each piece with a little powdered sugar (using a sieve) and serve.

Sweet Tart Dough
with Nuts
From Baking by Dorie Greenspan

1 1/4 cups all purpose flour
1/4 cup ground nuts (walnuts, pecans, etc- just pulse in food processor with a little powdered sugar)
½ cup confectioners’ sugar
¼ tsp salt
1 stick plus 1 tablespoon (9 T) very cold (or frozen) unsalted butter, cut into small pieces
1 large egg yolk

Put the flour, nuts, sugar, and salt in a food processor and pulse a couple of times to combine. Scatter the pieces of butter over the dry ingredients and pulse until the butter is coarsely cut in- you should have some pieces the size of oatmeal fakes and others the size of peas. Stir the yolk, just to break it up, and add it a little at a time, pulsing after each addition. When the egg is in, process in long pulses- about 10 seconds each- until the dough, which will look granular soon after the egg is added, forms clumps and curds. Just before you reach this stage, the sound of the machine working the dough will change- heads up. Turn the dough out onto a work surface and, very lightly and sparingly, knead the dough just to incorporate and dry ingredients that might have escaped mixing.

To press the dough into the pan: butter a 9-inch fluted tart pan with a removable bottom. Press the dough evenly over the bottom and up the sides of the pan, using all but one little piece of dough, which you should save in the refrigerator to patch any cracks after the crust is baked. Don’t be too heavy handed- press the crust in so that the edges of the pieces cling to one another, but not so hard that the crust loses its crumbly texture. Freeze the crust for at least 30 minutes, preferable longer, before baking.

To partially or fully bake the crust: center a rack in the center of the oven and preheat to 375 degrees F.

Butter the shiny side of aluminum foil and fit the foil, buttered side down, against the crust. (since you froze it, you can bake it without weights). Put the tart pan on a baking sheet and bake the crust for 25 minutes. Carefully remove the foil. If the crust has puffed, carefully press it down with the back of a spoon. For partially baked crust, patch the crust if necessary, then transfer the crust to a cooling rack. To fully bake the crust, bake for another 8 minutes or so, or until it is firm and golden brown. Transfer pan to a rack and cool the crust to room temperature before filling.

"Slightly Lighted" Pastry Cream
adapted from Baking by Dorie Greenspan

2 1/2 cups 2% milk
4 large egg yolks
1 egg
1/2 cup sugar
1/3 cup cornstarch, sifted
1 1/2 teaspoons pure vanilla extract
2 tablespoons unsalted butter, cut into bits at room temperature
Seeds from one vanilla bean (optional)

Bring the milk to a boil in a small saucepan.

Meanwhile, in a medium heavy-bottomed saucepan, whisk the egg yolks together with the sugar and cornstarch until thick and well blended. Still whisking, drizzle in about 1/4 cup of the hot milk-- this will temper, or warm, the yolks so they won't curdle. Whisking all the while, slowly pour in the remainder of the milk. Put the pan over medium heat and, whisking vigorously, constantly and thoroughly (making sure to get the edges of the pot), bring the mixture to a boil. Keep at a boil, still whisking, for 1 to 2 minutes, then remove the pan from the heat.

Whisk in the vanilla extract. Let sit for 5 minutes, then whisk in the bits of butter, stirring until they are full incorporated and the pastry cream is smooth and silky. Scrape the cream into a bowl. You can press a piece of plastic wrap against the surface of the cream to create an airtight seal and refrigerate the pastry cream until cold or, if you want to cool it quickly--as I always do--put the bowl into a larger bowl filled with ice cubes and cold water, and stir the pastry cream occasionally until it is thoroughly chilled, about 20 minutes.

May 10, 2010

Spinach and Feta Greek Pita Pizza

Photobucket{printable recipe here}
You Want Pies with That is back {they were actually back last month but I had a big old cast- now I'm chopping and cooking again, so I guess we're both back}! This month's theme is Pizza. It's a sad, sad truth that I love pizza but my Tall Man, Mr. Carbohydrate himself, doesn't eat tomatoes (or much dairy) which pretty much eliminates most pizzas from our regular dining. Nonetheless, I snap up any opportunity to enjoy a piece, which usually happens when I take little man to Costco. But, in an attempt to please my taste buds and my Tall Man's obnoxious and ornery stomach, we have Spinach and Feta Greek Pita Pizzas. Whew. The title is pretty much longer than the prep. And please tell me there's some, beloved food you don't make because of your husband. I'd feel better.

See my previous (albiet long ago) Pies with That Posts here (including my favorite "Emma Hearts Knightley Pie" that won the very first month). And lastly- I need to give a shout out to my new favorite pan, making it's first appearance on my blog. It's my first and only All Clad pan and I got it for three bucks at Goodwill. I was a little excited, as you might guess. Even my Tall Man was excited when I told him I'd saved close to 200 bucks, haha (not that I would have spent the 200, but getting the goods for nothing counts as saving, right? Right?)

PhotobucketSpinach and Feta Greek Pita Pizza
from Anne Strawberry
{printable recipe here}

2 onions, finely diced
1/2 bag baby spinach, roughly chopped (don't stress over the amount- I just used what I had on hand)
5 cloves of garlic, roughly chopped
kosher salt, pepper, and oregano
4 pitas
1/3 cup crumbled feta (read more here for brands we like)
paprika

Over medium heat, cook onions in olive oil for 5 minutes. Stir in spinach and garlic and cook, stirring occasionally, until everything is soft and carmelized. Add seasoning to taste and spread 1/4 of the mixture over each pita. Top with a little feta and a sprinkle of paprika and broil for two or three minutes, until slightly browned. Remove, cut, and serve.

Note- if you prefer a nice, crispy crust (like my mom, I'll be honest- I like soft or mushy food as my family would say) carefully place the prepared pizza straight onto the oven rack- but be sure to put a baking sheet below just in case something spills!

May 4, 2010

TWD- Burnt Sugar Ice Cream

PhotobucketIf you're thinking my Burnt Sugar Ice Cream looks a lot like Cookies and Cream, you're right. It's been absolutely insane around here! Things started out pretty easy. I saw a huge (half gallon I think) container of cream at Safeway for $1. Really. I snapped it up, thinking of all the delicious, artery clogging dishes I could make and then remembered I had ice cream to make for Tuesdays with Dorie! Then, a million commitments got in the way, everyone in my house got sick, but me (which meant no sleep for anyone really), and it was suddenly late Monday and we were having dinner at my parents. With the help with the kids I knew it was the only chance I'd get to make the ice cream. So I put the caramel on and let it do it's thing. It took forever. And then, I knew it was time. I'm really bad about taking it off before it gets dark enough but I was patient. And suddenly, my dad was taking out the baked beans (recipe coming, wow, they're so good) and in that three seconds it burned. I must have looked really disappointed, though I stand by my feeling that I was just tired, because everyone all at once told me it was okay and we could make it again. The ice cream bowl was frozen, the cream was measured, we were good to go, but it wasn't meant to be. I scooped out some Cookies and Cream and called it a night. I've heard this ice cream is amazing, though, so after a good night's sleep I'm going to try again.

Come back next week for a nice French Berry Tart (one of my favorite desserts of all time- no illness, kitchen disaster, or mommy fatigue will stop me!) See the real ice cream here. It'll make you hungry. And please, if you've ruined caramel more than you've made it, let me know. I could use a boost (or some advice apparently!)