Showing posts with label Pies with That. Show all posts

June 13, 2010

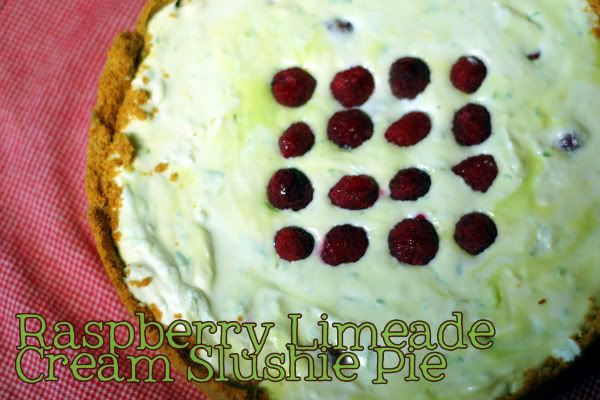
Raspberry Limeade Cream Slushie Pie

Photobucket
{printable recipe here}
Oh I'm so sorry I fell off the face of the earth and left my blog all... stale I guess! Well, I'm back. We took a last minute trip to Utah and I've been in recovery mode since. My laundry (and kids' sleep schedules) are finally back under control and I'm excited to post some fun recipes I've been working on. For today, though, I have my submission to this month's "You Want Pies with That" event- and the theme is Summer Drinks. Well, I don't really drink anything but water (or an occasional glass of milk with a cookie) but everytime I drive by Sonic I crave a cream slushie. So, when limes and berries were on sale, I knew my choice was made for me.

Now I really wanted this pie to turn out cute and fun, so I thought I would swirl the two batters together for some color contrast. I froze the pie and when I served it up it was so SOFT! I'll admit I was pretty heart broken. Just now, though, I realized my problem- I had forgotten to bake the key lime for a few minutes (I think I mixed my two baking favorites, Ina and Dorie, up- Ina's key lime pie is frozen but Dorie bakes hers first!) So, I guess the moral of the story is to "do as I say not as I do". Either way, this was yummy and I'm going to make it again and actually follow my own proper directions. Ahem. I think I needed a nice summer drink to cool my head down and pay attention! Don't forget to check out the rest of the Pies!

Raspberry Limeade Cream Slushie Pie
{printable recipe here}
from Anne Strawberry

For the crust:
1 3/4 cups graham cracker crumbs (about one sleeve)
3 tablespoons sugar
1/2 stick (4 tablespoons) unsalted butter, melted
1 teaspoon Lime Zest

For the lime filling:
4 large egg yolks
1 14-ounce can sweetened condensed milk
1/2 C. Fresh Key (or regular) lime juice (from about 5 regular limes)
1 teaspoon Lime Zest


For the cheesecake filling:
1 package Neufchatel (reduced fat cream cheese), softened
1/4 cup sugar
1 cup whipped cream (the recipe calls for Cool whip which would be fine I'm sure, but I prefer the real deal!)
1 teaspoon Lime Zest

To make the crust:

Butter a 9-inch springform pan (or pie plate or tart pan). Stir the crumbs and sugar together in a medium bowl. Pour over the melted butter and stir until all of the dry ingredients are uniformly moist. Turn the ingredients into the buttered springform pan and use your fingers to pat an even layer of crumbs along the bottom of the pan and about halfway up the sides. Don't worry if the sides are not perfectly even or if the crumbs reach above or below the midway mark on the sides—this doesn't have to be a precision job. Put the pan in the freezer while you preheat the oven.

Center a rack in the oven, preheat the oven to 350°F and place the springform on a baking sheet. Bake for 10 minutes. Set the crust aside to cool on a rack while you make the filling.

Working with a stand mixer, preferably fitted with a paddle attachment, or with a hand mixer in a large bowl beat the egg yolks and lime zest at high speed until thick and pale. Reduce the mixer speed to low and beat in the condensed milk. Still on low, add half of the lime juice. When it is incorporated, add the remaining juice, again mixing until it is blended. Pour into the shell and bake the pie for 12 minutes. Transfer the pie to a cooling rack and cool for 15 minutes.

Meanwhile, whip the cream cheese and sugar until it's soft and fluffy. Fold in the whipped cream and lime zest and pour over the key lime pie. Stir in or garnish with some raspberries and transfer to the freezer for an hour or two. Serve and enjoy! 

Crust and Lime filling adapted from Baking by Dorie Greenspan, Cheesecake recipe from Kraft Foods

May 10, 2010

Spinach and Feta Greek Pita Pizza

Photobucket{printable recipe here}
You Want Pies with That is back {they were actually back last month but I had a big old cast- now I'm chopping and cooking again, so I guess we're both back}! This month's theme is Pizza. It's a sad, sad truth that I love pizza but my Tall Man, Mr. Carbohydrate himself, doesn't eat tomatoes (or much dairy) which pretty much eliminates most pizzas from our regular dining. Nonetheless, I snap up any opportunity to enjoy a piece, which usually happens when I take little man to Costco. But, in an attempt to please my taste buds and my Tall Man's obnoxious and ornery stomach, we have Spinach and Feta Greek Pita Pizzas. Whew. The title is pretty much longer than the prep. And please tell me there's some, beloved food you don't make because of your husband. I'd feel better.

See my previous (albiet long ago) Pies with That Posts here (including my favorite "Emma Hearts Knightley Pie" that won the very first month). And lastly- I need to give a shout out to my new favorite pan, making it's first appearance on my blog. It's my first and only All Clad pan and I got it for three bucks at Goodwill. I was a little excited, as you might guess. Even my Tall Man was excited when I told him I'd saved close to 200 bucks, haha (not that I would have spent the 200, but getting the goods for nothing counts as saving, right? Right?)

PhotobucketSpinach and Feta Greek Pita Pizza
from Anne Strawberry
{printable recipe here}

2 onions, finely diced
1/2 bag baby spinach, roughly chopped (don't stress over the amount- I just used what I had on hand)
5 cloves of garlic, roughly chopped
kosher salt, pepper, and oregano
4 pitas
1/3 cup crumbled feta (read more here for brands we like)
paprika

Over medium heat, cook onions in olive oil for 5 minutes. Stir in spinach and garlic and cook, stirring occasionally, until everything is soft and carmelized. Add seasoning to taste and spread 1/4 of the mixture over each pita. Top with a little feta and a sprinkle of paprika and broil for two or three minutes, until slightly browned. Remove, cut, and serve.

Note- if you prefer a nice, crispy crust (like my mom, I'll be honest- I like soft or mushy food as my family would say) carefully place the prepared pizza straight onto the oven rack- but be sure to put a baking sheet below just in case something spills!

July 6, 2009

Summer Key Lime Pie

I've spent every summer of my life (except one in Utah and half of one in Paris) in Arizona. Let me tell you, summer here isn't about running around enjoying the weather and all the beautiful outdoor furniture Pottery Barn keeps emailing me. It's about surviving. And swimming. This is the first Arizona summer I've enjoyed "pregnant" (29 weeks today!) so I've really been trying to avoid the heat as much as possible.

This month's Pies with That challenge is to create a pie that means summer to you. While it is blistering hot and I'm aching for a nice February day, I've always loved living here and I'm more than willing to put up with the heat. I've been thinking a lot lately, too, that since I love my September birthday, I have to pay for it for my own daughter. So there you have it. I'm resorting to turning on every fan in the house, drinking tons of ice cold water, and eating lots of frozen dessert to get through these last seventy something days. I thought Dorie's Florida Pie was the perfect rendition of summer for me because it's refreshingly light and cool, only takes a couple of minutes in the oven (10 for the crust, which you could buy theoretically but I wouldn't recommend, especially since you can pile the crumbs high for a beautiful crust no problem, and 12 for the filling), and it includes coconut, which has always reminded me of sunblock. I know it's supposed to be the other way around, but I can't hardly smell coconut flavoring without picturing a public pool. Between that and the texture issue, I left it out. I needed this cooling, summer refreshment sans banana boat. Top it with shredded coconut if you're feeling daring. Keep this pie in the freezer for an extra refreshing treat, or let it soften for a few minutes if you're enjoying one of those Pottery Barn type summers I've read about.

In my anticipation of this pie, I couldn't wait to eat it. I took two quick pictures and served up a piece for my son and I to share. We were almost done when he said, "Wait Mommy!" He ran to the other room and found his toy camera and when he returned he said, "Take a picture Mommy!" After he did his thing, he figured we could finish off our slice. Wow, my poor kid. He is only two...

Summer Key Lime Pie
Adapted from Baking by Dorie Greenspan

For the crust:
1 3/4 cups graham cracker crumbs (about one sleeve)
3 tablespoons sugar
1/2 stick (4 tablespoons) unsalted butter, melted

For the filling:
4 large egg yolks
1 14-ounce can sweetened condensed milk
1/2 C. Fresh Key (or regular) lime juice (from about 5 regular limes)
1 teaspoon Lime Zest

To make the crust:

Butter a 9-inch springform pan (or pie plate or tart pan). Stir the crumbs and sugar together in a medium bowl. Pour over the melted butter and stir until all of the dry ingredients are uniformly moist. Turn the ingredients into the buttered springform pan and use your fingers to pat an even layer of crumbs along the bottom of the pan and about halfway up the sides. Don't worry if the sides are not perfectly even or if the crumbs reach above or below the midway mark on the sides—this doesn't have to be a precision job. Put the pan in the freezer while you preheat the oven.

Center a rack in the oven, preheat the oven to 350°F and place the springform on a baking sheet. Bake for 10 minutes. Set the crust aside to cool on a rack while you make the filling.

Center a rack in the oven and preheat the oven to 350 degrees F. Put the pie plate on a baking sheet lined with parchment of a silicone mat.

Working with a stand mixer, preferably fitted with a paddle attachment, or with a hand mixer in a large bowl beat the egg yolks and lime zest at high speed until thick and pale. Reduce the mixer speed to low and beat in the condensed milk. Still on low, add half of the lime juice. When it is incorporated, add the remaining juice, again mixing until it is blended. Bake the pie for 12 minutes. Transfer the pie to a cooling rack and cool for 15 minutes, then freeze the pie for at least 1 hour. Serve with whipped cream and garnish with lime zest or lime wedges.

May 6, 2009

Pies with That- Anne Strawberry Tart

When I was little, people used to call me Annie Banannie and I hated it! One day my uncle asked what I liked and I told him I liked strawberries, so he started calling me Annie Strawberry. It's stuck around and everyone knows strawberries are my very favorite food. That and lasagna. So when I read about a family favorites pie for Pies with That, I knew it had to be strawberry. Cream pies are a favorite with my family, too, so I put in a nice thick layer of pastry cream. I even went all out and used a vanilla bean (for my husband, since we're including all the family in this!)

I also went with a tart shell instead of a pie crust because I find they are a little less fussy and easier to put together in a hurry. Since my tall man also prefers a crunchy cookie crust this swap was even better for him. The added pecans gave it beautiful flavor and color, too. This tart is adaptable- add blueberries instead for my dad, a chocolate crust instead for my best friend, or even chocolate pastry cream. It's easy and flexible- which is what makes it a family favorite. And I'll be honest. I make one of these every month or two (that's often since I'm trying so many new desserts) and every time I'm whisked back to Paris. That alone makes this a family favorite.


Anne Strawberry Tart
One fully baked 9 inch tart shell, recipe below
Half a batch of Vanilla bean pastry cream, recipe below
1 pound strawberries, washed, stems removed, and sliced in half
2 tablespoons strawberry jam
Powdered sugar, for serving

Line baked and cooled tart shell with the pastry cream, spreading evenly over the bottom of the shell. Arrange the strawberries in a pattern, squeezing in tightly.

Heat strawberry jam until warm and spreadable in the microwave or a small saucepan. Brush over strawberries to create a shiny topping. Slice and sprinkle each piece with a little powdered sugar (using a sieve) and serve.

Sweet Tart Dough
with Nuts
From Baking by Dorie Greenspan

1 1/4 cups all purpose flour
1/4 cup ground nuts (walnuts, pecans, etc- just pulse in food processor with a little powdered sugar)
½ cup confectioners’ sugar
¼ tsp salt
1 stick plus 1 tablespoon (9 T) very cold (or frozen) unsalted butter, cut into small pieces
1 large egg yolk

Put the flour, nuts, sugar, and salt in a food processor and pulse a couple of times to combine. Scatter the pieces of butter over the dry ingredients and pulse until the butter is coarsely cut in- you should have some pieces the size of oatmeal fakes and others the size of peas. Stir the yolk, just to break it up, and add it a little at a time, pulsing after each addition. When the egg is in, process in long pulses- about 10 seconds each- until the dough, which will look granular soon after the egg is added, forms clumps and curds. Just before you reach this stage, the sound of the machine working the dough will change- heads up. Turn the dough out onto a work surface and, very lightly and sparingly, knead the dough just to incorporate and dry ingredients that might have escaped mixing.

To press the dough into the pan: butter a 9-inch fluted tart pan with a removable bottom. Press the dough evenly over the bottom and up the sides of the pan, using all but one little piece of dough, which you should save in the refrigerator to patch any cracks after the crust is baked. Don’t be too heavy handed- press the crust in so that the edges of the pieces cling to one another, but not so hard that the crust loses its crumbly texture. Freeze the crust for at least 30 minutes, preferable longer, before baking.

To partially or fully bake the crust: center a rack in the center of the oven and preheat to 375 degrees F.

Butter the shiny side of aluminum foil and fit the foil, buttered side down, against the crust. (since you froze it, you can bake it without weights). Put the tart pan on a baking sheet and bake the crust for 25 minutes. Carefully remove the foil. If the crust has puffed, carefully press it down with the back of a spoon. For partially baked crust, patch the crust if necessary, then transfer the crust to a cooling rack. To fully bake the crust, bake for another 8 minutes or so, or until it is firm and golden brown. Transfer pan to a rack and cool the crust to room temperature before filling.

Pastry Cream
From Baking by Dorie Greenspan

2 cups whole milk (I add an extra half a cup for my desired consistency)
6 large egg yolks
1/2 cups sugar
1/3 cup cornstarch, sifted
1 1/2 teaspoons pure vanilla extract
3 1/2 tablespoons unsalted butter, cut into bits at room temperature
Seeds from one vanilla bean (optional)

Bring the milk to a boil in a small saucepan.

Meanwhile, in a medium heavy-bottomed saucepan, whisk the egg yolks together with the sugar and cornstarch until thick and well blended. Still whisking, drizzle in about 1/4 cup of the hot milk-- this will temper, or warm, the yolks so they won't curdle. Whisking all the while, slowly pour in the remainder of the milk. Put the pan over medium heat and, whisking vigorously, constantly and thoroughly (making sure to get the edges of the pot), bring the mixture to a boil. Keep at a boil, still whisking, for 1 to 2 minutes, then remove the pan from the heat.

Whisk in the vanilla extract. Let sit for 5 minutes, then whisk in the bits of butter, stirring until they are full incorporated and the pastry cream is smooth and silky. Scrape the cream into a bowl. You can press a piece of plastic wrap against the surface of the cream to create an airtight seal and refrigerate the pastry cream until cold or, if you want to cool it quickly--as I always do--put the bowl into a larger bowl filled with ice cubes and cold water, and stir the pastry cream occasionally until it is thoroughly chilled, about 20 minutes.

January 4, 2009

Pies With That- Caramel Chocolate Banana Cream Pie

Happy new year everyone! I'm always shocked at how long it takes me to write the date properly after the year changes. I'm betting it will be at least March or April now, since I don't have to write the date on important documents all day long at home with my toddler. Besides, with a pie like this, there are more important things on my mind! This month's Pies with That theme, from Nic and Carrie, is "Resolution Breakers"- pies to make you forget about the scale (which too many of us did all December long!)

For my resolution breaking pie, I started with a no-fail pie crust, poured in a layer of caramel, added bananas, pastry cream, more bananas, more pastry cream, chopped milk chocolate, a drizzle of caramel, some whipped cream, and some more caramel and chocolate. Whew! With all those layers, I'm feeling guilty already. At least the bananas are healthy! And fortunately, this pie was shared with a crowd. It's all gone now and it's back to the treadmill. My husband and I have been talking about our goals for the year and I told him I was thinking about going vegetarian for a while. I think he'd die so we'll see. So speaking of your resolutions, what are yours? Less pie I'm guessing! Either way, I hope it's a safe and happy new year.

Banana Cream Pie
from Baking by Dorie Greenspan

Too turn this pie into a caramelly, decadent treat, make caramel using a can of sweetened consensed milk (I just opened mine and cooked it over a double boiler on low for a few hours, or try boiling the can at your own risk!), chop up a few ounces of chocolate, and top with sweetened whipped cream. Chocolate syrup would be the perfect addition, too!

For the Custard:
2 cups whole milk
6 large egg yolks
1/2 cups (packed) light brown sugar, pressed through a sieve
1/3 cup cornstarch, sifted
1/2 teaspoon ground cinnamon (a little more)
1/8 teaspoon freshly grated nutmeg (a little less)
1 teaspoon pure vanilla extract
3 tablespoons unsalted butter, cut into bits

3 ripe but firm bananas

1 9-inch single crust made with Good for Almost Everything Pie Dough, fully baked and cooled (or my no fail pie crust)

Bring the milk to a boil in a small saucepan.

Meanwhile, in a medium heavy-bottomed saucepan, whisk the egg yolks together with the sugar and cornstarch until thick and well blended. Still whisking, drizzle in about 1/4 cup of the hot milk-- this will temper, or warm, the yolks so they won't curdle. Whisking all the while, slowly pour in the remainder of the milk. Put the pan over medium heat and, whisking vigorously, constantly and thoroughly (making sure to get the edges of the pot), bring the mixture to a boil. Keep at a boil, still whisking, for 1 to 2 minutes, then remove the pan from the heat.

Whisk in the vanilla extract. Let sit for 5 minutes, then whisk in the bits of butter, stirring until they are full incorporated and the pastry cream is smooth and silky. You can either press a piece of plastic wrap against the surface of the cream to create an airtight seal and refrigerate the pastry cream until cold or, if you want to cool it quickly--as I always do--put the bowl into a larger bowl filled with ice cubes and cold water, and stir the pastry cream occasionally until it is thoroughly chilled, about 20 minutes. (If it's more convenient, you can refrigerate the custard, tightly covered, for up to 3 days).

When you are ready to assemble the pie, peel the bananas and cut them on a shallow diagonal into 1/4 inch slices.

Whisk the cold custard vigorously to loosen it, and spread about one quarter of it over the bottom of the pie crust- it will be a thin layer. Top with half of the banana slices. Repeat, adding a thin layer of pastry cream and the remaining bananas, then smooth the rest of the pastry cream over the last layer of bananas.

To make the topping:
Working with a stand mixer fitted with the whisk attachment or with a hand mixer in a large bowl, beat the cream until it just starts to thicken. Beat in the confectioners' sugar and vanilla and continue to beat until the cream holds firm peaks. Switch to a rubber spatula and gently fold in the sour cream.

To finish:
Spoon the whipped cream over the filling and spread it evenly to the edges of the custard. Serve, or refrigerate until needed.

December 3, 2008

Reese's "Jingle Bell Rock"-y Road Pie

Thanksgiving has come and gone and Christmas music is all over the radio! I finally feel ready for the holidays and this month's Pies With That theme- Holiday Songs. I had a ton of fun picking a theme but in all the mayhem I nearly missed making my own pie! It came to me, though, while I was driving one day- those chocolate bells could totally make a "Jingle Bell Rock" pie.

From there, I decided on Reese's chocolate bells and a rendition of my Aunt's wonderful peanut butter pie. For the rocky road portion, I mixed in toasted walnuts, marshmallows, and chopped chocolate (I opened my last bar of Greek chocolate I smuggled in my suitcase!). I also had to fight every urge to drizzle the whole thing with caramel or chocolate. It would have been beautiful but there was already PLENTY going on here without adding any more sugar!

That piece was cut out for the photo and stolen instantly! So much for a solo shot!

I intended to make a regular graham cracker crust but happened to run out of grahams before I got enough, so I threw some pretzels into the food processor to make up the difference. The crust ended up pleasantly salty and complimented the rest of the pie. I did make it in the spring form pan to hold more pie since I had a big crew eating it. Thankfully, this is one rich pie- so one 9 inch spring form covered about 16 people (plus toddlers- we don't usually count them for food but with desserts, they are starting to eat their share!). The end result reminded me a bit of Dorie's Peanut Butter Torte, but I liked it a bit more without the chocolate crust. But honestly... with peanut butter, chocolate, and more, "how bad can that be?!" Don't forget to enter the giveaway here if you haven't yet!

Previous Pie's With That entries:
Nie's Vintage Cherry Apple Pie and Galette
Emma Hearts Knightley Pie

Reese's "Jingle Bell Rock"-y Road Pie
from Anne Strawberry

Pretzel Graham Cracker Crust:

1 cup graham cracker crumbs
1 cup pretzel crumbs
3/4 stick melted butter
3 Tablespoons sugar

Preheat the oven to 375.

Combine all ingredients with a fork and press into butter, 9 inch spring form pan. Bake for 10 minutes and set aside to cool.

Peanut Butter Rocky Road Filling:
2 packages of Neufchatel cheese (or cream cheese), softened
1 1/2 cups powdered sugar (sifted if necessary)
1/2 cup milk
1 teaspoon pure vanilla extract
3 ounces chopped chocolate (not too fine)
1/2 cup toasted walnuts, chopped
1/2 cup mini marshmallows
1 bag Reese's peanut butter cup Christmas bells

In the bowl of a stand mixer fitted with the paddle attachment (or a hand mixer), combine cream cheese, powdered sugar, milk, and vanilla. Beat until smooth. Gently fold in chocolate, walnuts, and marshmallows. Dump into cooled pie crust and smooth.

Using a thin serrated nice, slice the Reese's bells in half and position in a pattern on top of the pie.

Refrigerate until firm (at least 4 hours) and serve. Top with chocolate sauce or caramel (if you can handle it!)

November 3, 2008

Nie's Vintage Cheery Apple Pie (and Galette)

Since the theme for this month's Pies with That Fashion theme was announced, I've been mulling over several ideas. The first interpretation of Fashion that came into my mind was very Coco Chanel. Since I was recently in Paris, I thought I'd do something black, sleek, and classy- maybe a Devil Wears Prada Pie. Then, I thought I would go with purple since it seems to be everywhere lately.

However, I'm getting ready to move into a new house and every home magazine I see seems more important suddenly. I've fallen in love with bright, whimsical vintage decorating. After spending considerable time reading the NieNie Dialogues and starting at a 40 pound box of apples, Nie's Vintage Cheery Apple Pie was born. If you haven't heard about NieNie, I'd encourage you to see her blog or her sister's wonderful site, C Jane Enjoy It.

NieNie (Stephanie Nielson), who lives only a few miles from me, and her husband were in a plane crash in August and suffered serious burns and their flight instructor died. They are both recovering well but the process is a long one. Since then, I've read their blogs and I feel like NieNie has become my friend. Her life is not that different than mine- same community, same church, same red lipstick, same "career" as a stay at home mom. However, her perspective and attitude is amazing. Reading about her life inspires me to be a better mother, wife, and neighbor. Her sense of style is also inspirational- beautiful colors, patterns- everything.

So, for my vintage pie, I thought I would go with yellow and red- colors that seem to pop up everywhere on Nie's blog and simple heart cutouts. For the yellow, I used Fuji apples (from Utah, like Nie!). For red, I added in dried cherries that remind me of polka dots. I also tried two different shapes- one traditional pie and one galette, which seems a little more whimsical and somehow more appropriate (especially atop my red glass platter). I used my Edible Markers to draw an "N" on one of the hearts.

Now I've never met NieNie, but I hope she'd approve. And I'd love to share this pie with her someday. If you'd like to learn more about NieNie and her family and what you can do to help, check out Nie Recovery. And then make a nice pie or vegetarian dinner and go share with a neighbor. As far as I can see, that's the NieNie thing to do. You can also see her simple, healthy, and delicious recipes on CuisineNie.

Last Month's Pie's with That Entry- Emma Hearts Knightley Pie

Stay tuned for next month's theme- I'm working on a write up now and hope everyone loves it!

Nie's Vintage Cheery Apple Pie

Good for Almost Everything Pie Dough
adapted from Dorie Greenspan

Ingredients
3 cups all-purpose flour
1/4 cup sugar
1 teaspoon salt
2 sticks very cold unsalted butter, cut into tablespoon-size pieces
3/8 cup very cold (frozen is even better) Crisco (plain, not butter flavored), cut into 4 pieces
About 1/2 cup ice water

Put the flour, sugar and salt in a food processor fitted with a metal blade; pulse just to combine the ingredients. Drop in the butter and shortening and pulse only until the butter and shortening are cut into the flour. Don't overdo the mixing—what you're aiming for is to have pieces the size of fat green peas and others the size of barley.

Pulsing the machine on and off, add 3 tablespoons of the water—add a little water and pulse once; add some more water and pulse again; and keep going that way. Then use a few long pulses to get the water into the flour. If after a dozen or so pulses, the dough doesn't look evenly moistened or form soft curds, pulse in as much of the remaining water, or even a few drops more, to get a dough that will stick together when pinched. If you've got big pieces of butter, that's fine. The dough is ready and should be scraped out of the work bowl and on to a smooth work surface. (be careful not too add too much water- if the dough looks dry after adding most of the water, pinch it with your hands to check if it's coming together, and finish combining it by hand)

Shape the dough into a disk and wrap it. Refrigerate the dough at least 1 hour before rolling. The dough can be kept in the refrigerator for up to 5 days or frozen for up to 1 month.

Apple Filling:
from Janet Stocks
About 3 pounds Fuji apples
3 Tablespoons Cornstarch
3/4 Cup Sugar
1 teaspoon Cinnamon
Dash of Nutmeg (optional)
1/2 Cup Cold Water
1/2 Cup Apple Juice
2 Tablespoons Lemon Juice
1/4 Cup Dried Cherries

Peel, core, and slice apples into medium, microwave proof bowl. Cover with plastic wrap and microwave on high for five minutes. Let cool slightly then drain liquid off apples.

Combine dry ingredients in medium saucepan. Add water, apple juice, and lemon juice and cook on medium heat, whisking, until thick and bubbly.

Fold in drained apple slices and dried cherries. Turn into unbaked pie crust, cover with top crust, and seal edges well. Prick and decorate as desired. Brush pie lightly with milk or egg wash and sprinkle with decorating sugar or cinnamon sugar.

Bake at 400 for 20 minutes. Reduce heat to 350 and bake for 30-40 minutes until crust is golden brown. Serve with ice cream.

For Galette:
(directions adapted from Dorie Greenspan)

Roll the dough into a large 1/8 inch thick circle. Using a pastry wheel or a paring knife, time the dough to a 13 inch diameter. Using a cake pan or a pot lid as a template and the tip of a blunt kitchen knife as a marker, lightly trace a 9 inch circle in the center of the dough- this is the area for the filling. Sprinkle a few tablespoons of breadcrumbs within the circle (optional, but a good idea) and then scoop about 2 cups of prepared apple pie filling onto the dough, taking care not to include too much liquid. Gently fold over the crust in a circular motion. As you lift the dough and place it on the filling, it will pleat. If you’re not in a rush, freeze the galette for 15 minutes to give the crust a rest.

Brush the dough very lightly with a little water, then sprinkle it with a teaspoon or two of sugar. Bake galette for 25 minutes, or until the crust is brown and the fruit is soft.

October 8, 2008

Emma Hearts Knightley Pie

Just in case my family doesn't think I spend enough time making and photographing food, I decided to join a new blogging event- "You want pies with that?" Inspired by the movie Waitress, once a month we will make a new pie based on the monthly theme. This month's theme is "Movies" and so I decided to make a pie based on one of my favorites- Emma with Gwyneth Paltrow. I did some searching to see if I could find out anything about what people might have eaten during Jane Austen's time and found a lot of things I wouldn't want to eat! I did remember the picnic in the movie where the picked strawberries, and Harriet's present of walnuts from Mr. Martin (in the book). So that's where Emma Hearts Knightley Pie came from. A nutty shortbread crust, creamy strawberry filling, a sprinkle of nuts, and a generous topping of whipped cream with another sprinkling of nuts on top makes a truly delicious pie. And I hope you guys are proud that I didn't fall back on my old favorite- fruit on top of pastry cream.

And while it might not be exactly what Jane Austen's character ate, it was still a delicious pie to serve my own Mr. Knightley (it's an old picture but I think the feeling is the same as Emma's).

Sweet Tart Dough
from Baking by Dorie Greenspan

1 1/4 cups all purpose flour
1/4 cup ground nuts (walnuts, pecans, etc- just pulse in food processor with a little powdered sugar)
½ cup confectioners’ sugar
¼ tsp salt
1 stick plus 1 tablespoon (9 T) very cold (or frozen) unsalted butter, cut into small pieces
1 large egg yolk

Put the flour, nuts, sugar, and salt in a food processor and pulse a couple of times to combine. Scatter the pieces of butter over the dry ingredients and pulse until the butter is coarsely cut in- you should have some pieces the size of oatmeal fakes and others the size of peas. Stir the yolk, just to break it up, and add it a little at a time, pulsing after each addition. When the egg is in, process in long pulses- about 10 seconds each- until the dough, which will look granular soon after the egg is added, forms clumps and curds. Just before you reach this stage, the sound of the machine working the dough will change- heads up. Turn the dough out onto a work surface and, very lightly and sparingly, knead the dough just to incorporate and dry ingredients that might have escaped mixing.

To press the dough into the pan: butter a 9-inch fluted tart pan with a removable bottom. Press the dough evenly over the bottom and up the sides of the pan, using all but one little piece of dough, which you should save in the refrigerator to patch any cracks after the crust is baked. Don’t be too heavy handed- press the crust in so that the edges of the pieces cling to one another, but not so hard that the crust loses its crumbly texture. Freeze the crust for at least 30 minutes, preferable longer, before baking.

To partially or fully bake the crust: center a rack in the center of the oven and preheat to 375 degrees F.

Butter the shiny side of aluminum foil and fit the foil, buttered side down, against the crust. (since you froze it, you can bake it without weights). Put the tart pan on a baking sheet and bake the crust for 25 minutes. Carefully remove the foil. If the crust has puffed, carefully press it down with the back of a spoon. For partially baked crust, patch the crust if necessary, then transfer the crust to a cooling rack. To fully bake the crust, bake for another 8 minutes or so, or until it is firm and golden brown. Transfer pan to a rack and cool the crust to room temperature before filling.


Strawberry Cream

From Domino
2 Pounds of Strawberries, cleaned and hulled
1 ¼ cups whole milk
¾ cup sugar
5 Tablespoons cornstarch
3 Tablespoons freshly squeezed lemon juice (from 1 lemon)

Place 2 pounds strawberries in a blender and blend on high until pureed, about 10 seconds (do in two batches if necessary).

Combine milk, sugar and cornstarch in a heavy-bottomed saucepan, and whisk until dissolved. Add the strawberry puree and lemon juice. Cook on high heat, whisking frequently, until the mixture is thick and bubbling (about 7 minutes); remove from heat. Pour into glass bowl and refrigerate 30 minutes.

After filling cools slightly, stir to loosen and spoon into the baked and cooled crust. Sprinkle with chopped nuts and return to refrigerated. Meanwhile, prepare whipped cream.

Whipped Cream:
1 cup heavy cream
2 Tablespoons confectioners' sugar
1 teaspoon Pure Vanilla Extract

Combine all ingredients in mixer and whip on high until stiff peaks form. Spread on top of pie and garnish with a strawberry.