April 29, 2008

Fluted Polenta and Ricotta Cake

Well this week's Tuesdays with Dorie selection was chosen by Caitlin. It was definitely out of the box for me, which is part of why I love this event! I'll admit I was a little wary, though, so I used my new little tart pans and halved the recipe- it yielded four tartlets. I used a dried fruit mix from Trader Joe's that included raisins and berries and they were delicious. I also skipped the butter on top of the batter and instead brushed the finished product with butter and sprinkled the cakes with sugar so they were cute and shiny. Personally, I thought they tasted like really sweet buttery cornbread (not quite what I was hoping for!). My husband thought they tasted like really sweet buttery cornbread (and he loved it!) So I guess it worked out in the end! I also dropped off a few pieces to my Brazilian friend since I heard this was similar to something they eat there- I'm still waiting for her verdict! Make sure to check out how everyone else did!

Fluted Polenta and Ricotta Cake
from Baking by Dorie Greenspan
About 16 moist, plump dried Mission or Kadota figs, stemmed (I used dried raisins and berries instead)
1 C. medium-grain polenta or yellow cornmeal
½ C. all-purpose flour
1 t. baking powder
1 C. ricotta
1/3 C. tepid water
¾ C. sugar
¾ C. honey
Grated zest of 1 lemon
2 eggs

Getting Ready: Center a rack in the oven and preheat the oven to 325 degrees F. Butter a 10 ½-inch fluted tart pan with a removable bottom and put it on a baking sheet lined with parchment or a silicone mat.

Check that the figs are, indeed, moist and plump. If they are the least bit hard, toss them into a small pan of boiling water and steep for a minute, then drain and pat dry. If the figs are large (bigger than a bite), snip them in half. (I used a raisin berry mix and plumped them first)

Whisk the polenta, flour, baking powder, and salt together.

Working with a stand mixer fitted with the whisk attachment or with a hand mixer in a large bowl, beat the ricotta and water together on low speed until very smooth. With the mixer at medium speed, add the sugar, honey, and lemon zest and beat until light. Beat in the melted butter, then add the eggs one at a time, beating until the mixture is smooth. Reduce the mixer speed to low and add the dry ingredients, mixing only until they are fully incorporated. You’ll have a sleek, smooth, pourable batter.

Pour about one third of the batter into the pan and scatter over the figs. Pour in the rest of the batter, smooth the top with a rubber spatula, if necessary, and dot the batter evenly with the chilled bits of butter. (I omitted the butter)

Bake for 35 to 40 minutes, or until a thin knife inserted into the center of the cake comes out clean. The cake should be honey brown and pulling away just a little from the sides of the pan, and the butter will have left light-colored circles in the top. Transfer the cake to a rack and remove the sides of the pan after about 5 minutes. Cool to warm, or cool completely. (I brushed the cakes with butter and sprinkled with sugar)

April 28, 2008

Lemon Shrimp Linguine

I've had some frozen shrimp falling out of the freezer everytime I go hunting for some chicken, so I thought I would try this recipe out again. I made a few modifications but it got a "make it again" review so I guess it's a keeper! I served it with fresh green beans and think broccoli could be delicious too. My husband doesn't like seafood so I might try it with chicken next time, I think it would work well (and would make me feel less guilty for adding cheese, which I think it needed!) I always love Giada's recipes and this was no exception!

Lemon Shrimp Linguine
adapted from Giada De Laurentiis

For the pasta:
1/2 pound linguine pasta
2 T. olive oil
2 shallots, diced
2 garlic cloves, minced
1/2 lb. frozen shrimp
Juice and zest of one lemon
1 t. kosher salt
pinch of red pepper flakes
1/2 t. freshly ground black pepper
1/3 C. chopped fresh flat-leaf parsley
1/3 C. freshly grated Parmesan cheese

For the pasta:
Bring a large pot of salted water to a boil over high heat. Add the pasta and cook until tender but still firm to the bite, stirring occasionally, about 8 to 10 minutes. Drain pasta, reserving 1/4 cup of the cooking liquid.

Meanwhile, warm the olive oil over medium heat. Add the shallots and garlic and cook for 2 minutes (be careful not to burn!). Add the shrimp and cook until pink, about 5 minutes. Add a few red pepper flakes if you like it hot. Add the cooked linguine, lemon juice, lemon zest, salt, parsley, cheese, and pepper. Toss to combine. Serve immediately.

April 22, 2008

TWD- Bill's Big Carrot Cake


Up until about four years ago I didn't like avocados. I don't know where I got this idea but since I'd spent many years not liking them, I was shocked that when I finally tried them, I realized I LOVE avocados! I guess I have the same problem when it comes to Carrot Cake. When Amanda from Slow like Honey chose it, I figured, well at least I wont be tempted to eat it! Wrong again. I decided I'd better half the recipe and make cupcakes so I could easily distribute them to friends without keeping them at my house. So with Baby's help, I shredded the carrots and got to work, and here as my first mistake. Instead of using the small grater, I did the big size, and I think they weighed down the batter too much.

The half batch of batter made 12 regular cupcakes, 6 minis, and a LOT of dishes. I put them into the oven and by the recommended time (I'd heard 25 minutes) all I had was flat mush. That's right. I baked them a little longer. They were still raw and funny looking. I ended up taking them out and just prying them out of the pan and dumping what I could salvage into a bowl that everyone snacked out of and topped their ice cream with.

While my cupcakes collapsed and didn't quite work out, they tasted ridiculously delicious. So good I almost forgot I don't like carrot cake. I didn't make the frosting since I didn't have cupcakes but I use a similar recipe all the time and add lemon zest to it. I will try again another time with cakes, not cupcakes, and lemony- cream cheesey, delicious frosting.

Make sure to check out the rest of the TWD peeps- hopefully they had better luck!

Bill's Big Carrot Cake

from Baking by Dorie Greenspan

Ingredients:

For the cake:
2 cups all purpose flour
2 teaspoons baking powder
2 teaspoons baking soda
2 teaspoons ground cinnamon
¾ teaspoon salt
3 cups grated carrots (about 9 carrots, you can grate them in food processor fitted w/ a shredding a blade or use a box grater)
1 cup coarsely chopped walnuts or pecans (I used Walnuts)
1 cup shredded coconut (sweetened or unsweetened)
½ cup moist, plump raisins (dark or golden) or dried cranberries (I used Craisins)
2 cups sugar
1 cup canola oil
4 large eggs

For the frosting:
8 ounces cream cheese, room temperature
1 stick ( 8 tablespoons) unsalted butter, at room temperature
1 pound or 3 and ¾ cups confectioners' sugar, sifted
1 tablespoon fresh lemon juice or ½ teaspoon pure lemon extract
½ cup shredded coconut (optional)
Finely chopped toasted nuts and/or toasted shredded coconut (optional)

Getting ready:
Position the racks to divide the oven into thirds and preheat the oven to 325 degrees Fahrenheit. Butter three 9-x-2-inch round cake pans, flour the insides, and tap out the excess. Put the two pans on one baking sheet and one on another.

To make the cake:
Whisk the flour, baking powder, baking soda, cinnamon and salt. In another bowl, stir together the carrots, chopped nuts, coconut, and raisins.

Working with a stand mixer, preferably fitted with a paddle attachment, or with a hand mixer in a large bowl, beat the sugar and oil together on a medium speed until smooth. Add the eggs one by one and continue to beat until the batter is even smoother. Reduce the speed to low and add the flour mixture, mixing only until the dry ingredients disappear. Gently mix the chunky ingredients. Divide the batter among the baking pans.

Bake for 40-50 minutes, rotating the pans from top to bottom and front to back at the midway point, until a thin knife inserted into the centers comes out clean. The cakes will have just started to come away from the sides of the pans. Transfer the cakes to cooling racks and cool for about 5 minutes, then run a knife around the sides of the cakes and unmold them. Invert and cool to room temperature right side up.

The cakes can be wrapped airtight and kept at room temperature overnight or frozen for up to 2 months.

To make the frosting:

Working with a stand mixer, preferably fitted with a paddle attachment or with a hand mixer in a large bowl, beat the cream cheese and butter together until smooth and creamy. Gradually add the sugar and continue to beat until the frosting is velvety smooth. Beat in the lemon juice or extract.

If you'd like coconut in the filling, scoop about half of the frosting and stir the coconut into this position.

To assemble the cake:

Put one layer top side up on a cardboard cake round or a cake plate protected by strips of wax or parchment paper. If you added the coconut to the frosting, use half of the coconut frosting to generously cover the first layer (or generously cover with plain frosting). Use an offset spatula or a spoon to smooth the frosting all the way to the edges of the layer. Top with the second layer, this time placing the cake stop side down, and frost with the remainder of the coconut frosting or plain frosting. Top with the last layer, right side up, and frost the top- and the sides- of the cake. Finish the top with swirls of frosting. If you want to top the cake with toasted nuts or coconut, sprinkle them on now while the frosting is soft.

Refrigerate the cake for 30 minutes, just to set the frosting before serving.

Serving:
This cake can be served as soon as the frosting is set. It can also wait, at room temperature and covered with a cake keeper overnight. The cake is best served in thick slices at room temperature and while it's good plain, it's even better with vanilla ice cream or some lemon curd.

Storing:
The cake will keep at room temperature for 2 to 3 days. It can also be frozen. Freeze it uncovered, then when it's firm, wrap airtight and freeze for up to 2 months. Defrost, still wrapped, overnight in the refrigerator.

April 20, 2008

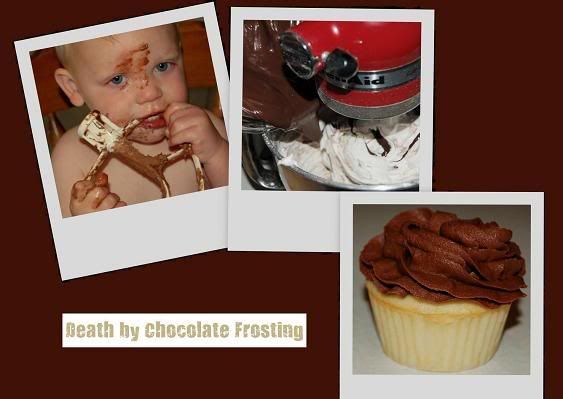
Death by Chocolate Frosting

Photobucket
A couple months ago my friend Anna made the most delicious frosting to top some birthday cupcakes. She used the Sprinkle's recipe from Candace Nelson on Oprah and everyone loved it (more than one person just licked the top off a couple cupcakes after devouring their first!)

So naturally, I got the recipe from Anna and when I saw the pound of butter I almost fainted. I mean, it tastes good, but that's really not helping my skinny jeans goal! Let's be honest, any cupcake isn't helping that goal. Either way, I attempt to thin it out a little bit and I still think it tastes ridiculously delicious. After I frost my cupcakes I use the extra to make graham cracker cookies (our technical term for a cracker slathered with frosting and topped with another cracker, then frozen. Yum). Trust me, this is one recipe where you'll be licking off the beater. And the spatula. And the bowl (and then you'll be too sick to eat a cupcake, which is a fair trade for me!).

Death by Chocolate Frosting
1 Bag dark chocolate chips
2 sticks of butter, softened
3/4 bag powdered sugar
1 T. vanilla (use the good stuff)
1/3 C. Sour cream
2 t. Meringue powder

Melt the chocolate over a double boiler and set aside. In a stand mixer with the paddle attachment, beat the butter and vanilla until fluffy. Add the powdered sugar and meringue powder slowly (I usually add it all, cover the mixer with a towel, and turn in on low) and then beat until fluffy and smooth. Add the sour cream, mix, then add the chocolate and mix just until blended. Frosts two dozen cupcakes.

April 18, 2008

Chocolate Cream Pie

Since I made two batches of marshmallows, I've had six egg yolks staring me in the face everytime I opened the fridge. So I decided to make Dorie's Pastry Cream again and thought chocolate sounded perfect. She didn't have a "playing around" option for chocolate so I found my old cook book from my college class and she said to keep everything the same and add 1/3 cup of cocoa to the dry ingredients. I added an extra egg because the mixture was too thick at first. It ended up cooking up nice and thick and delicious. I think next time I will also increase the milk by a 1/2 a cup or so. This pudding was a little thick to eat plain so I made it into a chocolate cream pie (and immediately took it over to the neighbors, it was way too tasty!) Forgive the store bought graham crust- I have a one year old and no food processor, okay? :) Next time! I also think this would be amazing in cream puffs. Mmmm...

Chocolate Pastry Cream (Adapted from Baking by Dorie Greenspan)
2 cups whole milk
6 large egg yolks (I used 7)
1/2 cups sugar
1/3 cup cornstarch, sifted (I hate sifting)
1/3 cup cocoa powder
1 1/2 teaspoons pure vanilla extract
3 1/2 tablespoons unsalted butter, cut into bits at room temperature

Bring the milk to a boil in a small saucepan.

Meanwhile, in a medium heavy-bottomed saucepan, whisk the egg yolks together with the sugar and cornstarch until thick and well blended. Still whisking, drizzle in about 1/4 cup of the hot milk-- this will temper, or warm, the yolks so they won't curdle. Whisking all the while, slowly pour in the remainder of the milk. Put the pan over medium heat and, whisking vigorously, constantly and thoroughly (making sure to get the edges of the pot), bring the mixture to a boil. Keep at a boil, still whisking, for 1 to 2 minutes, then remove the pan from the heat.

Whisk in the vanilla extract. Let sit for 5 minutes, then whisk in the bits of butter, stirring until they are full incorporated and the pastry cream is smooth and silky. (I skipped this step and just added it immediately after the vanilla) Scrape the cream into a bowl. You can press a piece of plastic wrap against the surface of the cream to create an airtight seal and refrigerate the pastry cream until cold.

Spoon the pudding into a graham cracker crust and serve with whipped cream enjoy.

April 15, 2008

TWD- Marshmallows

This week for Tuesday's with Dorie, Judy chose Marshmallows. I have to admit, I don't really like marshmallows. But, my husband LOVES them, so I figured I would try it out. I ended up making them twice because the first time they did not turn out very well. Everything actually worked fine, and I liked doing the egg whites and the candy, but the cornstarch on top turned into a nasty thick skin by the time they were dried.

So, I decided to turn my first batch into Rice Krispie Treats and started again (by the way- even with almost double the amount of cereal called for, these were soggy and turned into rice krispie goo, yuck!). This time it was really easy to make the marshmallows which I appreciated. I dusted another pan (this time I did a 9 x 9 square pan for more depth) and left the top bare. After they dried I plopped the pan out onto a silpat and tried cutting them with a knife, shears, and a pizza cutter. I think the pizza cutter made the smoothest lines but I was still displeased with the aesthetics of this dessert. I guess I'm a little crazy and like everything straight and perfect and floppy uneven marshmallows wasn't doing it for me!

I dusted some in cornstarch with powdered sugar, some with cornstarch and cinnamon, and some with cocoa powder with finely chopped nuts (I swirled chocolate syrup through one corner of the pan after pouring it into the mold). They all tasted pretty good and my husband has been munching them all day, so I guess it was a success. I don't think I'll make them again anytime soon, but now I know you can make them at home (which I hadn't thought of before for whatever reason!) I might try the flavor variations too- mango or raspberry sounded awesome.

Marshmallows (from Baking by Dorie Greenspan)

About 1 cup potato starch (found in the kosher foods section of supermarkets) or cornstarch
2 tablespoons light corn syrup
2 1/4-ounce packets unflavored gelatin
3 large egg whites, at room temperature
3/4 cup cold water
1 tablespoon pure vanilla extract
1 1/4 cups plus 1 tablespoon sugar

GETTING READY: Line a rimmed baking sheet -- choose one with a rim that is 1 inch high -- with parchment paper and dust the paper generously with potato starch or cornstarch. Have a candy thermometer at hand. (I used a 9 x 13 and then a 9 x 9 with butter then starch)

Put 1/3 cup of the water, 1 1/4 cups of the sugar and the corn syrup in a medium saucepan over medium heat. Bring the mixture to a boil, stirring until the sugar dissolves. Once the sugar is dissolved, continue to cook the syrup -- without stirring -- until it reaches 265 degrees F on the candy thermometer, about 10 minutes.

While the syrup is cooking, work on the gelatin and egg whites. In a microwave-safe bowl, sprinkle the gelatin over the remaining cold water (a scant 7 tablespoons) and let it sit for about 5 minutes, until it is spongy, then heat the gelatin in a microwave oven for 20 to 30 seconds to liquefy it.

Working in the clean, dry bowl of a stand mixer fitted with the whisk attachment or in another large bowl with a hand mixer, beat the egg whites on medium-high speed until firm but still glossy -- don't overbeat them and have them go dull.

As soon as the syrup reaches 265 degrees F, remove the pan from the heat and, with the mixer on medium speed, add the syrup, pouring it between the spinning beater(s) and the sides of the bowl. Add the gelatin and continue to beat for another 3 minutes, so that the syrup and the gelatin are fully incorporated. Beat in the vanilla.

Using a large rubber spatula, scrape the meringue mixture onto the baking sheet, laying it down close to a short end of the sheet. Then spread it into the corners and continue to spread it out, taking care to keep the height of the batter at 1 inch; you won't fill the pan. Lift the excess parchment paper up to meet the edge of the batter, then rest something against the paper so that it stays in place (I use custard cups).

Dust the top of the marshmallows with potato starch or cornstarch and let the marshmallows set in a cool, dry place. They'll need about 3 hours, but they can rest for 12 hours or more. (I skipped the top dusting on my better batch)

Once they are cool and set, cut the marshmallows with a pair of scissors or a long thin knife. Whatever you use, you'll have to rinse and dry it frequently. Have a big bowl with the remaining potato starch or cornstarch at hand and cut the marshmallows as you'd like -- into squares, rectangles or even strips (as they're cut in France). As each piece is cut, drop it into the bowl. When you've got 4 or 5 marshmallows in the bowl, reach in with your fingers and turn the marshmallows to coat them with starch, then, one by one, toss the marshmallows from one hand to the other to shake off the excess starch; transfer them to a serving bowl. Cut and coat the rest of the batch.

SERVING: Put the marshmallows out and let everyone nibble as they wish. Sometimes I fill a tall glass vase with the marshmallows and put it in the center of the table -- it never fails to make friends smile. You can also top hot chocolate or cold sundaes with the marshmallows.

STORING: Keep the marshmallows in a cool, dry place; don't cover them closely. Stored in this way, they will keep for about 1 week -- they might develop a little crust on the outside or they might get a little firmer on the inside, but they'll still be very good.

April 14, 2008

Wolgang Puck's Pizza


After I finished watching Julia Child's chefography yesterday, I watched the beginning of Wolfgang Puck's. Seeing all the gourmet pizza inspired dinner so did a Google search for his pizza dough recipe, and what do you know, he conveniently had it on his website. I made it in my Kitchenaid with the dough hook and not only was it fast, it was delicious! It's definitely the best pizza dough I've made yet (thanks for perfecting the recipe, Wolf!) We made four individual pizzas and used whatever we had in the fridge for different flavors- BBQ Chicken, a few Pesto pizzas, and a Hawaiian. I think next time I'll try brushing one with butter and garlic and leaving it bare for an appetizer like they do at The Smokehouse. Yum.

Wolfgang Puck's
Pizza Dough


1 package active dry or fresh yeast (I used 2 1/2 t. since I don't buy the packages)
1 teaspoon honey
1 cup warm water (105º F to 115º F)
3 cups all-purpose flour
1 teaspoon kosher salt
1 tablespoon extra-virgin olive oil, plus more for brushing

1. In a small bowl, dissolve the yeast and honey in 1/4 cup of the warm water.

2. In a mixer fitted with a dough hook, combine the flour and the salt. Add the oil, yeast mixture, and the remaining 3/4 cup of water and mix on low speed until the dough comes cleanly away from the sides of the bowl and clusters around the dough hook, about 5 minutes. (This only took about three for me)

3. Turn the dough out onto a clean work surface and knead by hand 2 or 3 minutes longer. The dough should be smooth and firm. (I oiled my hands and surface first, and then the bowl)

Cover the dough with a clean, damp towel and let it rise in a warm spot for about 30 minutes. (When ready, the dough will stretch as it is lightly pulled.)

4. Place a pizza stone on the middle rack of the oven and preheat the oven to 500º F. (My pizza stone is in storage so I just used two regular rimmed baking sheets, and did the oven at 500 convect bake)

5. Divide the dough into 4 balls, about 6 ounces each. Work each ball by pulling down the sides and tucking under the bottom of the ball. Repeat 4 or 5 times. Then on a smooth, unfloured surface, roll the ball under the palm of your hand until the top of the dough is smooth and firm, about 1 minute. Cover the dough with a damp towel and let it rest for 15 to 20 minutes. At this point, the balls can be wrapped in plastic and refrigerated for up to 2 days.

6. To prepare each pizza, dip the ball of dough into flour, shake off the excess flour, place the dough on a clean, lightly floured surface, and start to stretch the dough. Press down on the center, spreading the dough into an 8-inch circle, with outer border a little thicker than the inner circle. If you find this difficult to do, use a small rolling pin to roll out the dough. Lightly brush the inner circle of the dough with oil and arrange the toppings of your choice over the inner circle. (I skipped the oil and used pesto, marinara, or BBQ sauce according to the toppings)

7. Using a lightly floured baker’s peel or a rimless flat baking tray, slide the pizza onto the baking stone and bake until the pizza crust is nicely browned, 10 to 12 minutes. Remember that the oven is very hot and be careful as you place the pizza into and out of the oven. Transfer the pizza to a firm surface and cut into slices with a pizza cutter or very sharp knife. Serve immediately.

Toppings we tried:

BBQ Chicken Pizza- BBQ sauce, grilled chicken, sauteed onions and peppers, fontina cheese
Artichoke Pesto Pizza- Pesto, artichoke hearts, grilled chicken, fontina cheese
Hawaiian Pizza (I know, so creative)- Marinara sauce, ham, pineapple, fontina cheese
Pepper Pesto Pizza- Pesto, sauteed onions and peppers, fontina cheese

April 12, 2008

My Life in France by Julia Child


I just finished reading My Life in France by Julia Child and Alex Prud'Homme. This book was in my recommendation section on Amazon so I picked it up from the library and didn't put it down until I finished it. It's beautiful. I remember watching Julia Child once or twice on TV but I'm too young to really remember her (though I remember how tall was and I've since always related to her!). Reading this book makes me feel like I know her and makes me sad she is gone! I'm going to have to order her cook books now too! I studied abroad in Paris one summer and reading her descriptions of La Belle France made me ache to go back. What a wonderful book... I feel like I should run off and make her bread now!

From the candid recounting of her adventures to the beautiful descriptions of the food, I enjoyed every bit of this book. One of the things that she said especially stands out to me. After describing a horrible kitchen disaster, she says that she didn't apologize to her company or berate herself. She says that cooks should never start in on self-deprecations but "must simply grit her teeth and bear it with a smile- and learn from her mistakes." (pg. 71). I'm going to take this to heart! After all, everyone has to learn sometime. And as think book points out, not even Julia Child was perfect- but she worked hard and never compromised. And that's what made her wonderful.

April 11, 2008

French Dip Sandwiches


I found a recipe for these sandwiches on Baking Bites a few weeks ago. The first time I made it my Dad said, "Hey, this tastes better than Vito's!" (the local expensive Italian place). That's about as big of compliment as he gives, so look out, these are tasty. I made a few modifications, so here is my version. Throw this in the slow cooker in the morning and you'll be all set for a tasty dinner. My husband prefers BBQ so he just throws some BBQ sauce on his meat and everyone is happy (even if I think he's ruining it!) This is a nice, quick, versatile meal.

Slow Cooker French Dip Sandwiches

2-3 Lb. Beef Chuck Cross Rib Roast (or a similar cut of meat, whatever is on sale is what I usually buy!)
3 C. beef broth
3/4 C. white grape juice (calls for red wine usually but I always substitute juice)
2 cloves garlic, minced
2 onions, diced
pepper
1 packet onion soup mix
Crusty Rolls
Optional- Provolone cheese

Cover beef with pepper and place in slow cooker. Chop onions and garlic and add to the beef. Add the liquid and the soup mix and cover. Cook on high for about 5 hours (maybe 8 hours for low... but I always seem to be in a hurry!) Meat should be extremely soft and shred when you touch it. Pull it apart and let it sit in the juice for a few minutes before serving. Serve on halved rolls with reserved liquid for dipping. Enjoy!

*edit*- last time I made this I just omitted the juice and the soup mix, added a little kosher salt, and enjoy. Simple and delicious!

April 10, 2008

Click April 2008 Photo Entry- Au Naturel


Last month I saw a few links to this contest and loved checking out the pictures. When I saw this months theme, "au naturel", I knew just the picture. The original link to this photo is here.

I live in Arizona and have several citrus trees. When I went to grab a few oranges one morning in January, I reached in for a nice, juicy looking one, and was shocked to find this orange. It was split in half with two colors- one side looking like a traditional orange, and the other more the color of a grapefruit (one side also tasted better than the other!) No joke. I have not touched up or modified the color of this orange at all.

This strange, unique orange is "au naturel" and I've never seen one like it, ever. It's just a reminder to me of how beautiful and unpredictable nature is.

*Photo taken with my Nikon D50 with an AF-S Nikkor 18-55 MM Lens*

April 8, 2008

TWD- Most Extraordinary French Lemon Cream Tart


This weeks recipe for Tuesdays with Dorie came from Mary of Starting from Scratch- she has some great photos on her blog and I'm going to try some her vegan recipes, though I'll probably need to make some hot dogs on the side for the guys, lol. The Most Extraordinary French Lemon Cream Tart. Doesn't that just sound delicious? I had a few bumps along the road but it was tasty anyways. All the men were busy on Saturday night so the ladies headed over to my Aunt's to bake together.

I made the cream beforehand so it could chill and be nice and set by the time it was ready. I didn't have a problem getting it to the right temperature and I was pleasantly surprised how easy it was to whisk. I have bad wrists anyways so I almost used the whisk attachment on the hand mixer but this was perfectly fine to do by hand, even for me. My good pan was in storage and my Mom threw out her tart pans years ago apparently (she keeps everything, but not what I needed this time!) so I headed to my Aunt's with my ingredients in tow and crossed my fingers that she would have a pan. She makes the most amazing pies so I knew if it came to that, I could use a pie tin. She did have a spring form pan, but not a food processor (no blame there... mine is in storage) so my Mom wielded the pastry cutter while Kristi and I made Nutter Butter Truffles (yes they were delicious, but my biggest loser girls should be proud to know I didn't eat a single one!)

As for the tart, I thought the dough was overly crumbly but it pressed into the pan okay eventually and tasted good. We had some oven temperature issues so I think the product was less than it could have been in the perfect oven with the perfect tart pan. Even so, when they guys got home, everyone had fun chatting and licking their plates clean. I think I'll file this recipe away for something fancy and beautiful to make later on. The lemon cream was SO good straight out of the pan that I think it's best I don't make it often (especially with the 2 1/2 cubes of butter!- I didn't tell anyone eating it there was so much. LOL.)

The recipe is over at Starting from Scratch. Check it out and the other great TWD entries!

April 6, 2008

Southwest Macaroni with Chipotle Chicken Sausage

The other day at Trader Joe's I saw some Chipotle Chicken Sausage and figured I would give chicken a shot, since turkey was unanimously voted down at my house. These are precooked and really flavorful- pretty hot actually, and it was perfect with the mild creamy sauce. Also, I usually substitute chicken stock for lots of the milk or cream to help cut back and I don't think you could even tell (though the cups of cheese might have helped in this department!)

I used the new Ronzoni smart taste which is higher in fiber and tastes great (same with the Barilla too). I have also added pureed vegetables to my pasta dishes in the past without adverse taste or texture. Sometimes I sneak a container or two of baby food squash in and no one is the wiser. I'll get around to making puree's like Deceptively Delicious and The Sneaky Chef recommend, but for now, baby food works and I have it on hand anyways!

Southwest Macaroni with Chipotle Chicken Sausage

1 box elbow pasta
1/2 onion
3 T. flour
3 T. butter
1 C. milk
3 C. chicken broth
Pepper
2 1/2 C. Cheese (I like sharp cheddar and pepper jack mixed)
4 scallions (green part only), roughly chopped
1 package chicken sausage, chopped in 1/4 inch slices, and browned quickly to warm through

Cook pasta one minute less than the al dente directions. The macaroni will continue cooking so make sure to cook it at least a minute or two less so it doesn't turn mushy. Brown the sausage in a skillet or grill pan until heated through. Then cut into 1/4 inch pieces and set aside.

Meanwhile, start the sauce:
Grate 1/2 an onion into a large saucepan with deep walls. Add flour and butter and put over low heat. Make a roux by whisking it together and cooking it on low for a couple of minutes to cook out the flour taste. It should be nice and light brown. Then, whisk in the milk and chicken broth until everything is well incorporated. Add fresh ground pepper, and red pepper flakes if you like it hot, and let it thicken up for a few minutes, stirring occasionally. Stock or bullion is usually so salty I don't add any salt at all.

After sauce is nice and thick, remove from heat. Slowly stir in the cheese, but be careful to not overeat it so it begins to separate. Put the cooked pasta into a 9 x 13 baking dish. Add the sausage, green onion, and halved grape tomatoes (if you like cooked tomatoes, I only did this in half of my dish). Pour the cheese sauce over everything and stir.

Top with breadcrumbs, if desired, cover with tin foil, and bake for 15-20 minutes at 350. Make sure the pasta is underdone, though, or you'll end up with macaroni mush! I usually just bake mine for a bit to warm everything through, turn off the oven, and leave it in there until everyone is home and ready for dinner. Enjoy!

April 3, 2008

I love citrus


I love citrus. When we lived in Utah for school I missed the fresh fruit all winter long and would pine for home when I would see the sickly green-tinged oranges being sold for far too much at the grocery store. Now that we are back in sunny Arizona, my baby and I head to the backyard and pick an orange at least once a day. It's wonderful. Well the days are heating up now and summer is nearly here, which means if the fruit isn't gone already, it's almost done anyways. Here are a few things to do with the left-overs:

*Zest the fruit with a microplane and freeze the zest (make sure to only get the bright skin, not the bitter pith)
*After removing the zest, juice the fruit and freeze what you won't use in half cup portions (baggies layed flat in the freezer work well for this, just be sure to label them!)
*Make homemade lemonade or limeade, my favorite- 1 C. juice, 3/4 C. of sugar (more if you are like my husband!), and a pitcher full of water. Yum!
*Make a cake and add zest to the frosting. Substitute the liquid in the recipe for lemon or orange juice. I like this especially with red velvet cake and to garnish the cake with some strips of zest too.
*Make a chicken marinate- lemon juice, olive oil, salt, and pepper- put it all in a baggie, add the meat, let it sit for several hours, and toss it on the grill (or grill pan for those still in the depths of winter!)
*Try Jenny's lemon poppyseed muffins over at Picky Palate. These are so delicious, I honestly make them once a week. This is the first recipe I ever made off a foodie blog and my favorite yet. Seriously, go make them right now.
*Make french toast and top it with a little butter, powdered sugar, and a squeeze of lemon or lime.
*Take your favorite cinnamon roll recipe and instead of brown sugar and cinnamon, spread the dough with butter, granulated sugar, and orange jest. After baking, top with a glaze of powdered sugar and orange juice.
*Try Barefoot Contessa's Mini Orange Chocolate Cakes- I make mine in muffin tins and they don't disappoint (love Ina!)

April 1, 2008

TWD- Gooey Chocolate Cakes

This weeks Tuesdays with Dorie challenge was chosen by Leigh of Lemon Tartlet. She's cute and I love reading her blog and she made a great choice! Wow, these cakes looked amazing from the time I first read the recipe till we licked our plates clean. They turned out delicious and I think they were just the right amount of choclate-ness. I used 3.5 ounces of 70% cacao and the rest was the milk chocolate. I love the milk chocolate. Somehow, the rest off the bar has disappeared... But it wasn't my doggy Sam, even though he was intensely interested in the whole process and never left my side.

My testers liked it and said it tasted just like the molten cakes they ate on their recent cruise, just gooey enough but cooked enough not to worry about salmonella (nothing like poisoning your dinner guests to complete the evening!) I think we all would have done better to hold off on baking the cakes until after dinner, we were completely, if happily, stuffed.

Next time I think I will dust the pan with cocoa powder like Ina sometimes suggests, or maybe try to use a little less flour- you could see a bit around the edges of the finished product, but it didn't effect the taste at all. They popped right out and were yummy. In my haste, I also forgot to add the finely chopped chocolate so I used that in some cookies on Saturday. Next time I'll remember (and there will be a next time for these babies, though I'm wondering how they would turn out with white chocolate since DH can't eat Cocoa...any suggestions?)

Gooey Chocolate Cakes
1/3 cup all-purpose flour
3 tablespoons unsweetened cocoa powder
¼ teaspoon salt
5 ounces bittersweet chocolate (4 ounces coarsely chopped,1 ounce very finely chopped)
1 stick (8 tablespoons) unsalted butter, cut into 8 pieces
2 large eggs, at room temperature
1 large egg yolk, at room temperature
6 tablespoons of sugar

Getting ready: Center a rack in the oven and preheat the oven to 400 degrees F. butter (or spray – it’s easier) 6 cups of a regular-size muffin pan, preferably a disposable aluminum foil pan, dust the insides with flour and tap out the excess. Put the muffin pan on a baking sheet.

Sift the flour, cocoa and salt together.

Set a heatproof bowl over a saucepan of gently simmering water, put the coarsely chopped chocolate and the butter in the bowl and stir occasionally over the simmering water just until they are melted – you don’t want them to get so hot that the butter separates. Remove the bowl from the pan of water.

In a large bowl, whisk the eggs and yolk until homogenous. Add the sugar and whisk until well blended, about 2 minutes. Add the dry ingredients and, still using the whisk, stir (don’t beat) them into the eggs. Little by little, and using a light hand, stir in the melted chocolate and butter. Divide the batter evenly among the muffin cups and sprinkle the finely chopped chocolate over the batter.

Bake the cakes for 13 minutes. Transfer them, still on the baking sheet, to a rack to cool for 3 minutes. (There is no way to test that these cakes are properly baked, because the inside remains liquid.)

Line a cutting board with a silicone baking mat or parchment or wax paper, and, after the 3-minute rest, unmold the cakes onto the board. Use a wide metal spatula to lift the cakes onto dessert plates.