June 29, 2010

TWD- Citrus Drenched Cake

Photobucket
{printable recipe here}
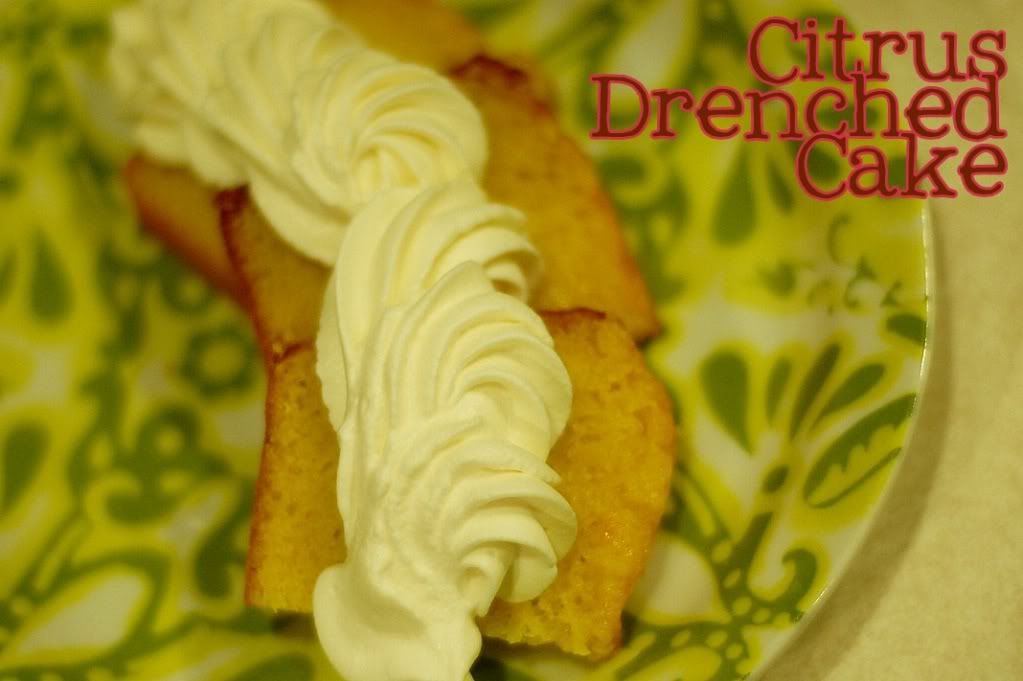
Do I put whipped cream on everything? No. Really, no, but apparently I do it put it on almost everything that goes on my blog. And of course, whipped cream was a delicious accompaniment to my loose adaptation of Dorie's Rum Drenched Vanilla cake (thanks for the great choice, Wendy!) After ten too many trips to the store, I opted to make do with what was in the kitchen, so my halved version of the recipe doesn't include the rum, the vanilla bean, or even the cream (except on top- I thankfully had some of that in the fridge!) It does have lots of zest and fresh juice. It's delicious. Just make sure you don't underbake it, like I have a tendency to do!

PhotobucketCitrus Drenched Cake
from Anne Strawberry
{printable recipe here}
adapted from Baking by Dorie Greenspan

For the Cake-

1 1/3 cups all-purpose flour
1 1/4 teaspoons baking powder
Pinch of salt
1 1/4 cups of sugar
1 teaspoon pure vanilla extract
1 teaspoon lemon extract
1 teaspoon lemon or orange zest
3 large eggs, room temperature
1/3 cup of heavy cream (I used milk- it was fine, but I'm sure cream would make this even better!)
1 stick butter, melted and cooled

For the Syrup
1/3 cup water
1/4 cup sugar
1/4 cup freshly squeezed orange juice

Center a rack in the oven and preheat the oven to 350. Butter a 8 1/2-x-4 1/2-x-2 1/2 -inch loaf pan, dust the inside with flour and tap out the excess. Place the pan on an insulated baking sheet or on two regular sheets stacked one on top of the other.

Sift the flour, baking powder and salt together.

Put the sugar and the lemon zest in a large bowl and, working with your fingers, rub them together until the sugar is moist and fragrant. (If you are using vanilla extract, add it later, after you’ve added the eggs.) Add the eggs and whisk them into the sugar, beating until they are thoroughly incorporated. Whisk in the extract, if you are using it, then whisk in the cream, followed by the rum. Continuing with the whisk or switching to a large rubber spatula, gently stir in the dry ingredients in 3 or 4 additions; the batter will be smooth and thick. Finish by folding in the melted butter in 2 or 3 additions. Pour the batter into the pans, smoothing the tops with a rubber spatula.

Bake for 55 to 60 minutes, or until a knife inserted into the center of the cakes comes out clean. (As soon as the cakes go into the oven, make the syrup.) After about 30 minutes in the oven, check the cakes for color–if they are browning too quickly, cover them lightly with foil tents.
Meanwhile, Make the Syrup: Stir the water and sugar together in a medium saucepan over medium heat until the sugar melts, then bring to a boil. Remove the pan from the heat and stir in the juice. Pour the syrup into a heatproof bowl and let cool.

When the cake tests done, transfer to a wire rack to cool for 5 minutes before unmolding and turning right side up on the rack. Place the rack over a baking sheet lined with wax paper and, using a thin skewer, cake tester or thin-blade sharp knife, poke holes all over the cake. Brush all over with the syrup, working slowly so that the cake sops it up. Cool to room temperature.

June 22, 2010

TWD- Cinnamon Chip Swirled Bread

Photobucket
I've been nesting. Well, not really nesting, because I'm not pregnant, but lately I've been going through every nook and crazy in our house, trying to make it more organized. It all started (this round, I had it bad at the end of my pregnancy with Baby Strawberry, too, but I wouldn't admit I was nesting and just said I was working my tail off, wouldn't some one get me a cold drink and a pedicure already?) when I tripped on another toy and though, "There has to be a better way! Or I'm throwing away every toy in this house!" Of course I want the toys out to be accessible and played with, the kids to be clean and happy and napped, the food hot and ready when my husband gets home. Ahem. I also want the toys put away (after they are played with!) So I've been hunting for perfect toy storage which leads to me perpetually trying to rearrange our couch- to accommodate a play area and simultaneously hide the toys! We have a huge and comfy sectional sofa and I love it. But I just can't escape the feeling that there is a better way to fit it all in- especially since I've been stalking Craigslist and Good Will and brought home and refinished a few pieces of furniture that my husband wasn't sure we needed! Well after we moved around the couch (and moved it right back where it was) I decided to tackle the garage. Somehow, the toys, copious baking dishes, camping gear, and painting supplies aren't cooperating and are overrunning my poor little garage. It's doing better now but I think I spent a little too much time baking my brain in the heat and and not enough time in my hot kitchen. I have the wrong Tuesdays with Dorie recipe again, this week. In other news, I have already made next weeks recipe. So we're good to go on that. And I found some pans in the garage that I am looking forward to using. I'm also excited to review something from CSN Stores again- last time I got a stellar pan and this time I'm debating between getting a rice cooker or (don't laugh) sometime to store the toys. That's versatility there. Do you have a rice cooker, love it, hate it, store it in the far corner of the garage and forget about it? I burn/undercook the rice embarrassingly often and since it's one of my Tall Man's favorite carbs, I need to do something about that already.

We did love this swirled bread. It was so yummy. I made a regular loaf and a mini, one traditional and one with cinnamon chips (pictured above). It came together in a hurry (made and baked before Church even on Father's Day, not too bad) and tasted great. Get the recipe from the lovely Susan here, or buy the book (it's worth it, promise!)

One more thing about the toys, does anyone have something like this or think it would work for a three year old and his little sister? Or a magical solution to keep it all cute and contained (obviously I'm asking too much!) I've been reading housekeeping books lately- like Real Simple's and Mrs. Meyer's and hope it's going to translate into a neater house- we'll see. And I'm not sure if reading books about cleaning and organizing is more or less weird than reading cook books, which I do far too often.

Come back later this week for some Mango Sorbet. Just thinking about it has me ready to run and buy some more mangoes!

June 15, 2010

TWD- Tender Shortcakes

Photobucket
If you're thinking I missed the shortcake boat, you're right. I made the wrong recipe for this week on accident! Never fear, though, since any Dorie treat is guaranteed to be delicious. These Shortcakes were no exception.

Photobucket
I only made half a batch because I almost passed out when I read the recipe and did a quick "butter per serving" approximation. Before you go calling me Ellie Krieger, I do bake out of Dorie's lovely book often enough that a little butter doesn't scare me- I know you're all SO surprised. Even so, lots of butter, with lots of cream (so essentially more butter) and not that many servings left me a little nervous! I'm not sure why I kept avoiding this recipe for these reasons, especially since I've openly confessed  my love for pastry cream which is much more deadly, nutrionally speaking! So, back to my faulty logic, I halved the recipe and used a cookie scoop to make smaller shortcakes. Piled mile high with berries, no one noticed. Then I topped them with lots and lots cream, because apparently I don't count the calories in the garnish in my crazy reasonings! I have to say, this recipe is simple and easy and a good use of cream if your container is about to go bad (I'm told some people don't bake often?) It came together in a hurry, only required a few minutes in the oven, and was extremely versatile. And these tasted great, butter, cream, whipped cream and all. A definite make again!

Photobucket

Find the recipe here- Cathy is one of my favorite TWD bakers (thanks for the great choice!) And if you don't have all your weeks mixed up like I do, you can see the beautiful Raisin Swirl Bread from the rest of the TWD group. Hopefully I'll sneak that one in later this week!

June 13, 2010

Vegetable Tian (or how to use all that zucchini)

{printable recipe here}
When I saw Ina make this, I knew I would love it (not uncommon while watching Barefoot Contessa, I'll admit). I like every single vegetable in there. Add some seasonings and roast- how bad can that be? Ina delivered as usual. And since you don't have to peel any of these veggies, all you have to do is chop chop and line them up. It looks pretty impressive but is actually super simple. With all the delicious, summer veggies overflowing, this dish is cheap, delicious, and healthy. Go go.

What do you like to make with all the summer produce? I can't live on just zucchini bread (although I might like to, it really hardly qualifies as bread, don't you think?)

Vegetable Tian
from Anne Strawberry
{printable recipe here}
recipe from Ina Garten

Good olive oil
2 large yellow onions, cut in half and sliced
2 garlic cloves, minced
1 pound medium round potatoes, unpeeled
3/4 pound zucchini
1 1/4 pounds medium tomatoes
1 teaspoon kosher salt
1/2 teaspoon freshly ground black pepper
1 tablespoon fresh thyme leaves, plus extra sprigs
2 ounces Gruyere cheese, grated (I subbed Parmesan- I'll only eat that stinky Gruyere in Croque Monsieur, Macaroni, or Fondue!)

Preheat the oven to 375 degrees F. Brush a 9 by 13 by 2-inch baking dish with olive oil. In a medium saute pan, heat 2 tablespoons of olive oil and cook the onions over medium-low heat for 8 to 10 minutes, until translucent. Add the garlic and cook for another minute. Spread the onion mixture on the bottom of the baking dish.

Slice the potatoes, zucchini, and tomatoes in 1/4-inch thick slices. Layer them alternately in the dish on top of the onions, fitting them tightly, making only 1 layer. Sprinkle with salt, pepper, thyme leaves, and thyme sprigs and drizzle with 1 more tablespoon of olive oil. Cover the dish with aluminum foil and bake for 35 to 40 minutes, until the potatoes are tender. Uncover the dish, remove the thyme sprigs, sprinkle the cheese on top, and bake for another 30 minutes until browned. Serve warm.

Raspberry Limeade Cream Slushie Pie

Photobucket
{printable recipe here}
Oh I'm so sorry I fell off the face of the earth and left my blog all... stale I guess! Well, I'm back. We took a last minute trip to Utah and I've been in recovery mode since. My laundry (and kids' sleep schedules) are finally back under control and I'm excited to post some fun recipes I've been working on. For today, though, I have my submission to this month's "You Want Pies with That" event- and the theme is Summer Drinks. Well, I don't really drink anything but water (or an occasional glass of milk with a cookie) but everytime I drive by Sonic I crave a cream slushie. So, when limes and berries were on sale, I knew my choice was made for me.

Now I really wanted this pie to turn out cute and fun, so I thought I would swirl the two batters together for some color contrast. I froze the pie and when I served it up it was so SOFT! I'll admit I was pretty heart broken. Just now, though, I realized my problem- I had forgotten to bake the key lime for a few minutes (I think I mixed my two baking favorites, Ina and Dorie, up- Ina's key lime pie is frozen but Dorie bakes hers first!) So, I guess the moral of the story is to "do as I say not as I do". Either way, this was yummy and I'm going to make it again and actually follow my own proper directions. Ahem. I think I needed a nice summer drink to cool my head down and pay attention! Don't forget to check out the rest of the Pies!

Raspberry Limeade Cream Slushie Pie
{printable recipe here}
from Anne Strawberry

For the crust:
1 3/4 cups graham cracker crumbs (about one sleeve)
3 tablespoons sugar
1/2 stick (4 tablespoons) unsalted butter, melted
1 teaspoon Lime Zest

For the lime filling:
4 large egg yolks
1 14-ounce can sweetened condensed milk
1/2 C. Fresh Key (or regular) lime juice (from about 5 regular limes)
1 teaspoon Lime Zest


For the cheesecake filling:
1 package Neufchatel (reduced fat cream cheese), softened
1/4 cup sugar
1 cup whipped cream (the recipe calls for Cool whip which would be fine I'm sure, but I prefer the real deal!)
1 teaspoon Lime Zest

To make the crust:

Butter a 9-inch springform pan (or pie plate or tart pan). Stir the crumbs and sugar together in a medium bowl. Pour over the melted butter and stir until all of the dry ingredients are uniformly moist. Turn the ingredients into the buttered springform pan and use your fingers to pat an even layer of crumbs along the bottom of the pan and about halfway up the sides. Don't worry if the sides are not perfectly even or if the crumbs reach above or below the midway mark on the sides—this doesn't have to be a precision job. Put the pan in the freezer while you preheat the oven.

Center a rack in the oven, preheat the oven to 350°F and place the springform on a baking sheet. Bake for 10 minutes. Set the crust aside to cool on a rack while you make the filling.

Working with a stand mixer, preferably fitted with a paddle attachment, or with a hand mixer in a large bowl beat the egg yolks and lime zest at high speed until thick and pale. Reduce the mixer speed to low and beat in the condensed milk. Still on low, add half of the lime juice. When it is incorporated, add the remaining juice, again mixing until it is blended. Pour into the shell and bake the pie for 12 minutes. Transfer the pie to a cooling rack and cool for 15 minutes.

Meanwhile, whip the cream cheese and sugar until it's soft and fluffy. Fold in the whipped cream and lime zest and pour over the key lime pie. Stir in or garnish with some raspberries and transfer to the freezer for an hour or two. Serve and enjoy! 

Crust and Lime filling adapted from Baking by Dorie Greenspan, Cheesecake recipe from Kraft Foods