Showing posts with label Food Allergies. Show all posts

March 15, 2016

Strawberry Pie for Pi Day


Happy Pi Day! Did you make or eat a pie to celebrate? Making a pie feels so therapeutic to me that I really appreciate the excuse. I love to roll out the crust, concoct a filling, and crimp the edges. The long baking time only adds to the anticipation. Yesterday my little blondies helped me make a pie in honor of Pi Day. I needed something the whole team could eat, and with the food allergies around here that means no dairy and no eggs (we have a few others to contend with but they aren't typical pie ingredients.) 

So fruit pie won out and a dairy free crust (no egg wash of course!) Strawberries are on sale around here this week so I turned to my Pie Pinterest board and took inspiration from this gorgeous Strawberry Balsamic Pie. I used my beautiful Emile Henry pie pan I scored at TJ Maxx for a traditionally shaped pie. I followed my mom's all shortening pie crust recipe so I didn't offend the non-dairy team, made an imperfect lattice crust (my kids LOVED weaving it) and brushed it with almond milk. I sprinkled sanding sugar on top and baked it. It came out juicy and fragrant with red color that can't be beat. 

Strawberries and balsamic vinegar make a delicious combo. I like the mix some sliced fresh strawberries with a shake of vinegar and some sugar to form a syrup- then I serve them with whipped cream (add a sprinkle of black pepper if you're adventurous). You can't pinpoint the vinegar flavor but it really enhances the strawberries. The same is true of this pie. I didn't use as much as the inspiration recipe called for because my bottle ran out, but it really enhanced the strawberries.

I usually prefer a fresh strawberry pie but this was a fun change and a good change to walk my kids through the whole pie making process. I don't want them to grow up afraid to experiment in the kitchen. I've certainly made my share of imperfect pies and desserts, but as Ina says, "flour, sugar, butter, how bad can that be?" Even messy pies are usually delicious- especially topped with a little vanilla ice cream. You can always use a crust from the store, too, and experiment with fillings. Pie making is a lot of fun and doesn't have to be stressful! Local friends- if you'd like to come over and make a pie and have a play date, let me know. I promise it's fun and the experiment is always delicious.

PS- I finally started a foodie instagram account as @anne.strawberry . I'd love to see you there! 


Pie making can be pretty messy with the flour and everything so I always double my recipe to make four single crusts, shape the dough into disks, wrap in saran wrap, then in a labeled baggie (I had a helper do this last time, they look so happy in her kindergarten hand!) and into the freezer it goes. The next time I want to make pie I move them into the fridge the night before or set them on the counter for a little while and all I have to worry about is the filling. Plus, a pie of ready to go pie crusts in my freezer makes me feel all put together, and doesn't take any more time. Dorie says one month in the freezer but I've kept mine, properly wrapped, for a few months with no problem. 

One last pie tip- Dorie suggests crushing up a graham cracker or two into the bottom of the crust before adding the filling to help absorb some of the extra liquid. Even with juicy strawberries my pie came out just right (and the graham crumbs totally disappear so you have no idea it was there!)


Strawberry Pie

1 double pie crust (easy dairy free crust here, or butter crust recipe below. Use whatever crust you prefer!)

3 pounds fresh strawberries, quartered
1 apple, grated (I used a gala, any kind should work)
1/4 cup sugar
1 tablespoon Ultragel or 2 tablespoons cornstarch
2 tablespoons balsamic vinegar
1/2 teaspoon vanilla
dash of kosher salt

2 graham crackers

Preheat the oven to 425. 

Combine filling ingredients in a large bowl. Line pie pan with one crust. Crumble up graham crackers and sprinkle into the pie crust. Pour in and smooth filling. Top with additional crust (whole or lattice, whatever you prefer. Either way make sure there's holes to vent the pie). Crimp the edges as desired. Brush with a beaten egg or milk and decorate as desired- with additional pie crust shapes cut with cookie cutters, sprinkled with sugar or sanding sugar, etc.

Bake for 10 minutes, reduce heat to 350 and bake for 45-60 more minutes. Watch the crust and add a foil tent if it starts to brown too much (usually about half way through). Let cool and serve with vanilla ice cream.


Good for Almost Everything Pie Dough
adapted from Dorie Greenspan

Ingredients3 cups all-purpose flour

1/4 cup sugar
1 teaspoon salt
2 sticks very cold unsalted butter, cut into tablespoon-size pieces
3/8 cup very cold (frozen is even better) Crisco (plain, not butter flavored), cut into 4 pieces
About 1/2 cup ice water

Put the flour, sugar and salt in a food processor fitted with a metal blade; pulse just to combine the ingredients. Drop in the butter and shortening and pulse only until the butter and shortening are cut into the flour. Don't overdo the mixing—what you're aiming for is to have pieces the size of fat green peas and others the size of barley.

Pulsing the machine on and off, add 3 tablespoons of the water—add a little water and pulse once; add some more water and pulse again; and keep going that way. Then use a few long pulses to get the water into the flour. If after a dozen or so pulses, the dough doesn't look evenly moistened or form soft curds, pulse in as much of the remaining water, or even a few drops more, to get a dough that will stick together when pinched. If you've got big pieces of butter, that's fine. The dough is ready and should be scraped out of the work bowl and on to a smooth work surface. (be careful not too add too much water- if the dough looks dry after adding most of the water, pinch it with your hands to check if it's coming together, and finish combining it by hand)


Shape the dough into a disk and wrap it. Refrigerate the dough at least 1 hour before rolling. The dough can be kept in the refrigerator for up to 5 days or frozen for up to 1 month.

November 10, 2010

Baked's Flourless Chocolate Cake

Flourless Chocolate Cake
{printable recipe here}
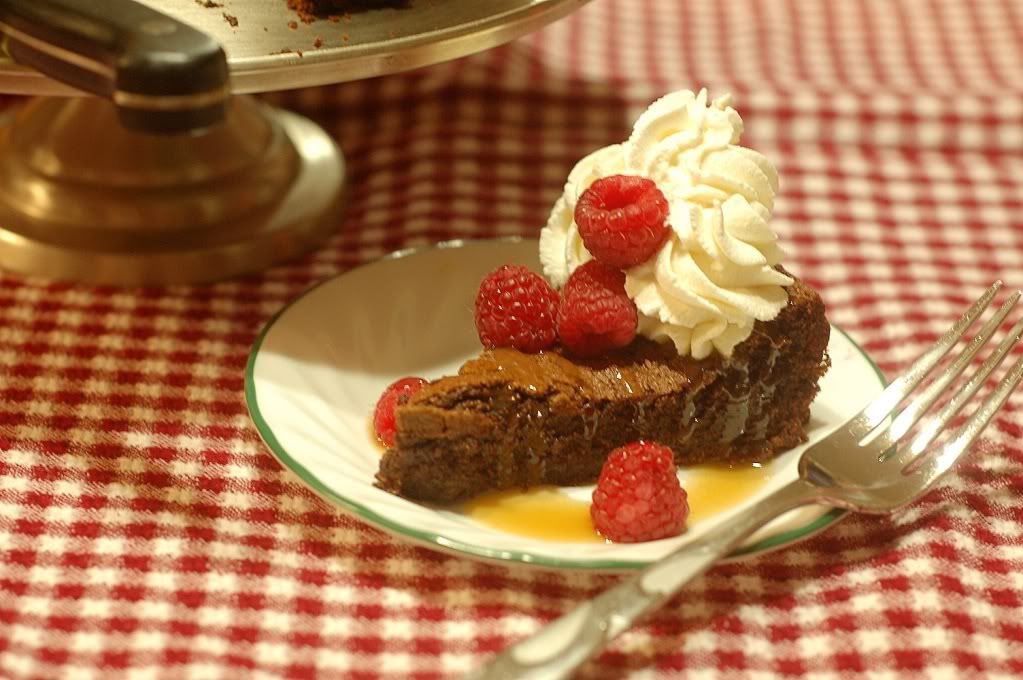
Oh man, I can practically taste this chocolate cake as I look at the pictures and write this post. The texture was amazing- from the first slice through the cake to the last bite into my mouth. This recipe comes from Baked. I'm probably the last person to finally get my hands on this book (they even have a second, now) but I loved it when I finally did! So far I've tried this cake and their easy hot fudge sauce- both were hits. I loved browsing all the different recipes and really want to try their root beer cake. Do you have a favorite? Leave me a comment and let me know what I should try next. I loved this cake because although it's gluten free and perfect for my friend with a wheat allergy, you don't stop and think for one minute that you are missing out. I also found separating the eggs and folding them into the batter a little therapeutic, but that might just be me. I have a feel I'm not the only "emotional baker" out there though!


PS Come back soon for a sweet cookware giveaway!

Flourless Chocolate Cake
Note: I slathered this cake in whipped cream, raspberries, and caramel sauce. Use your imagination- just about anything would taste great with the chocolately goodness!

Flourless Chocolate Cake
from Baked by Matt Lewis and Renato Poliafito
{printable recipe here}

10 ounces dark chocolate, coarsely chopped
10 tablespoons butter, softened
1 cup sugar
7 large eggs, separated
1 teaspoon vanilla
1 teaspoon salt

Preheat the over to 350. Generously butter a 9 inch sprinform pan. Line the bottom with a parchment circle then butter the paper.

Melt the chocolate in the microwave or double boiler, set aside to cool.

Using a hand mixer, stand mixer, or whisk, whisk the egg whites and salt until they are stiff. Set aside.

In your stand mixer, use the paddle to beat the butter and sugar on high for about five minutes, until very light and well combined.

Reduce to low speed and add the egg yolks one at a time. After they are well incorporated, scrape the bowl down with a spatula, add in the cooled chocolate, and mix. Add in the vanilla and beat until just combined.

Using a spatula, gently fold one cup of the egg whites into the chocolate mixture. Add the remaining egg whites and gently fold until almost completely combined. Go slowly and lightly, making sure you are careful and don't overwork the batter.

Pour into the pan, smooth the top, and bake for 30 to 35 minutes (the cake should look set on top, but don't overbake it!) Let cool on a rack and then loosen the cake with a knife, remove the sides of the pan, and serve.

August 15, 2008

Carlee's Chocolate Cupcakes (Eggless)


Last night, we celebrated my niece's second birthday and I was in charge of dessert. Since this party was mostly to be attended by toddlers, I wanted something cute and pink for the birthday girl. However...

This little pretty is allergic to eggs so I had to go hunting for an eggless cupcake recipe (none of those in Baking!). Although I've made many cupcakes, I'd never made any without eggs. So, I asked my Dorie friends for suggestions and did a little research (I can't wait to try soy flour next time). This cute blog, MJay Knits, led me to a chocolate cupcake recipe that worked out great. It's even vegan (sans icing). Even though Carlee is still pretty little, I think cupcake culture imprints early- she was SO excited when I walked carrying a huge try of cupcakes! She kept yelling "Cake! Fire!" until we finally lit the candles.

I was pleasantly surprised by these cupcakes. They had the right amount of leavening and turned out great. I actually thought they tasted better the next day and they came out of the wrappers easier on day two. They're not going to be my go to recipe, but if I'm out of eggs and need something in a pinch, this fast, easy recipe works great. Dressed up with a nice icing, I don't think most people will notice the different type of cake.

I found the batter to be pretty runny so I added a tablespoon of cake flour. Next time, I'll be careful not to over-fill the muffin tins because those cupcakes poofed a little too much and stuck to the top of the pan. With my modifications, I'd say this recipe makes about 14 regular cupcakes, filled 2/3 full before baking. I used plain Hershey's cocoa powder but I think a little variation in that could really change the flavor of the recipe. Next time I'll try adding chocolate chips, too, just for kicks.

Carlee's Cupcakes (Eggless Chocolate Cupcakes)
adapted from Allrecipes

1 1/2 cups plus 1 tablespoon cake flour
1 cup white sugar
1/4 cup unsweetened cocoa powder
3/4 teaspoon baking powder
3/4 teaspoon baking soda
1/2 teaspoon salt
1 cup water
1/3 cup vegetable oil
1 tablespoon distilled white vinegar
1 teaspoon vanilla

Preheat oven to 350 degrees F. Line a regular muffin pan with 12 to 14 cupcake papers, or grease and flour the pan.

Sift the flour, sugar, cocoa, baking powder, baking soda and salt together. Make a well in the center and add the water, oil, vinegar and vanilla. Beat until smooth and pour batter into the prepared pan.

Bake at 350 degrees F for 20-22 minutes, or until a toothpick inserted into the center of a cupcake comes out clean.

Anne's Easy Chocolate Icing
(generously frosts a dozen)

2 tablespoons Neufchatel or cream cheese, softened
2 tablespoons butter, softened
2 cups powdered sugar
1/2 cup cocoa powder
pinch of salt
1 tablespoon of milk

Cream butter and cream cheese in a stand mixer with the whisk attachment until light and smooth. Add the rest of the ingredients, cover mixer with a dish towel, and turn onto low until combined. Increase speed to high and whip frosting until smooth. Add 1/2 teaspoon of milk at a time until desired consistency. Spread of pipe onto cooled cupcakes and top with sprinkles.

For added stability, add 1 tablespoon of meringue powder with the powdered sugar (but not if the birthday girl is allergic to eggs!).

And just to keep it real... a real life photo of my "studio"- after three kinds of cupcakes, Dorie's vanilla bean ice cream, three icings, Ina's smoked salmon dip, a spur of the moment pantry reorganization, and Carlee's present waiting to be wrapped. At least the first picture looks glamorous. And at least the living room is clean, because I'll be honest, this kitchen took 2 hours to clean! I'm sure it's worth it, though. Store bought icing? Yuck!