April 27, 2011

Wednesday Want- The Saucinator Whisk

Today's (super late) Wednesday Want features something that I really want for my own kitchen, and have yet to get my hands on! I went to a great cooking class at Shar's in Gilbert over the weekend. It was fun to see her demonstrate all the great pressure cookers, fun gadgets, and new recipes. It was not so fun walking away lusting after $300 pans. I did check out this new whisk, though, and can't wait to get my hands on one. It's called "The Saucinator" (silly but true) and it features coils on the bottom as well as a coil up the handle for extra efficiency. The bottom is also covered in silicone to prevent scratching of my pretty pan that I usually use for sauces. I was anxious to try this whisk after Shar effortlessly made a huge batch of gravy (no lumps!) but they were sold out. Amazon Prime to the rescue, it can be here by the weekend, ready to whip up a batch of pastry cream or maybe some strawberry pie filling. Around 7 bucks, it won't break the bank either. If only it came in red...

Have you used the saucinator before? Have a favorite amazing whisk? Please let me know in the comments!

April 26, 2011

TWD- Apple Tart Handpies

{printable recipe here}
Yesterday I went to make the cornmeal shortbread cookies for TWD and realized I had no cornmeal! I still needed to make the tourtley apple tart so I decided that would have to do, so I set about making the pastry (nut free for Baby Strawberry). I pulled out one of my prized jars of homemade applesauce, since Dorie's description of the apple filling sounded so similar. My friend's grandma always made the best applesauce, spiced with cinnamon, mashed only a little to yield a thick, chunky, fragrant treat. I just can't eat any other kind now (though I'll admit I do buy the huge jars of Treetop at Costco for the kids!)

Last summer my thoughtful best friend Kara gave me several bushels of tart apples from her parents' tree. My mom and I made batch after batch of applesauce and apple pie filling to last all year with her steam canner. It's the only thing I've really canned before but it's not that intimidating and so rewarding. I only have a few jars left and can't wait for apple season to come again. If you haven't made applesauce before, I'd encourage you to try it soon. It's really not that time consuming with the apple peeler tool and the end product is so rewarding. Next time you have several apples languishing in the bottom of the fridge give it a try and let me know that I'm not the only person that's high maintenance about something as trivial as applesauce!

When it came time to shape the tart dough, I realized my mini tart pans were at my mom's, so I used my little dumpling press to make these hand pies. I bought a set at Ross several years ago (similar to this one) and they don't take up much room in the pantry and work really well for handpies. My husband loves the crust to filling ratio, too. While I certainly heavily deviated from the intended recipe, the flavors are the same and they are absolutely wonderful.  Even better, it all came together in just a few minutes. Thanks Dorie for the inspiration and Jeannette for the recipe choice!

 
Gram McGrath's Apple Sauce (the only kind Anne Strawberry will eat)
from Anne Strawberry
{printable recipe here}

8 Apples (I prefer the tart/firm varieties, but whatever you have on hand will work)
1 Cup Water
1/2 - 2/3 Cup Sugar, depending on the sweetness of the apples
2/3 Teaspoon Cinnamon

Peel, core, and slice the apples (I use my handy apple peeler/slicer to make quick work of this job, even my little man can do it).

In a large saucepan (or a big stockpot if you're doubling the recipe, I usually do) combine the apples, water, and sugar. Simmer until soft (about 15-20 minutes) and mash with a potato mashed- don't drain! Add cinnamon, stir, and eat warm.

April 25, 2011

Deviled Eggs

Hope you had a nice Easter weekend! We had great company, awesome food, even perfect weather! I colored eggs with the kids and my light tile miraculously made it out alright, even if Baby Strawberry sported a bright blue hand for a few days. Only after we finished did someone tell me they always do their eggs outside, why didn't I think of that? They turned out pretty well even though I couldn't find the actual dye kit anywhere (some hot water, a little vinegar, and a squirt of my gel food coloring worked awesome- except the fuchsia came out a little crazy). My little man was so proud of the beautiful eggs and a not too happy that I wanted to mess with them, but deviled eggs were calling. I've never made them before so I scoped out a basic recipe from Rachael Ray. They turned out great (and looked pretty cute cut with my crinkle cutter, thanks for the tip Paula!)

Anne Strawberry Made Deviled Eggs For the First Time
{printable recipe here}
recipe adapted from Rachael Ray

12 large eggs
Ice water
6 tablespoons mayonnaise
2 teaspoons mustard
1 pinch cayenne pepper
Salt and black pepper
Paprika, for dusting

In a large pot, arrange the eggs in a single layer and add enough water to cover. Bring to a boil over high heat, then cover and remove from the heat; let stand for 10 minutes. Drain, then cover the eggs with ice water. Let stand until cool to the touch.

Peel the eggs, halve lengthwise and scoop the yolks into a medium bowl, reserving the egg whites. Mash the yolks with the mayonnaise, mustard and cayenne; season with salt and black pepper. Spoon the yolk mixture into the egg white halves and dust with paprika.

April 22, 2011

By the Book Friday- Parmesan Asparagus for Easter

{printable recipe here}
Can you believe Easter weekend is here? It's snuck up on me again. We are going to have our standard menu- ham (Costco style), potatoes, homemade rolls, and Parmesan asparagus or green beans (whichever is on sale, is that awful?) I usually make something fruity for dessert, like Lemon Curd Cheesecake. This week I tried out a Cherry Pineapple Cobbler thanks to Lucky Leaf Pie Filling. I will post that delicious recipe later today (crossing my fingers!)

The recipe that inspired today's By the Book Friday Post comes from Ina Garten's Barefoot Contessa Family Style. It's no secret that I have a big crush on Ina and she really can't do any wrong in my eyes. I'll admit that I didn't follow the recipe exactly, as she roasts the asparagus and my oven was full at the time (oh, to have a double oven!) So instead, I blanched the asparagus by cooking them for two or three minutes in boiling water, then stopping the cooking by covering them with ice water. Then I crisped them up in a hot skillet with a little butter and olive oil and added the rest of the flavors in Ina's recipe- kosher salt, freshly ground pepper, generous Parmesan cheese, and lemon juice. It just takes a couple minutes and the final product is really fragrant and delicious (even my little man ate these up). And like I said, you can use fresh green beans instead- either makes a delicious spring dinner side dish.

Do you have any Easter favorites that you make every year? I hope you have a wonderful Easter weekend!

Parmesan Asparagus with Lemon from Anne Strawberry
{printable recipe here}
adapted from Ina Garten

2 1/2 pounds fresh asparagus (about 30 large)
2 tablespoons good olive oil
1/2 teaspoon kosher salt
1/4 teaspoon freshly ground black pepper
1/2 cup freshly grated Parmesan
2 lemons cut in wedges, for serving

Preheat the oven to 400 degrees F. (note- I blanked them instead, so I boiled a large pan of water to begin).

If the stalks of the asparagus are thick, peel the bottom 1/2 of each. Lay them in a single layer on a sheet pan and drizzle with olive oil. Sprinkle with salt and pepper. Roast for 15 to 20 minutes, until tender. Sprinkle with the Parmesan and return to the oven for another minute. Serve with lemon wedges.

Variation: Instead of roasting in the oven, I blanched the asparagus for three minutes in salted boiling water. Next, submerge the asparagus in ice water to 'shock' it. Transfer to a skillet warmed over medium high with a couple tablespoons of olive oil or butter and brown for just one or two minutes. Then season and garnish as above, with salt, pepper, sliced Parmesan cheese, and the juice of half a lemon. Serve immediately.

April 13, 2011

Wednesday Want- Cookie Scoops

Anyone know what's wrong with Photobucket? My pictures are all in hiding and it's making me crazy! Anyways, if you're new here, please come again. I'm trying to get it sorted out and today for my Wednesday Want I have one of my very favorite tools- the humble metal scoop. It's technically an ice cream scoop but I don't use mine for that, ever. I love this scoop for making the most typical cookies into something special. You could use store bought dough and scoop them out and they would come out perfectly shaped, bake evenly, and look like a million bucks (but making the dough is my favorite part, so I never do that!)


The same goes for cupcakes- I use a scoop this size for the perfect cupcake. Not only does a scoop make the job of dishing out the dough or batter (that used to be my least favorite part) much quicker, it's also much more effective. That's the best. I also use a cookie scoop to make gorgeous pancakes and be a hero to all the carb lovers in my house.


There's a ton of different sizes available- I have three or four. This one is a pretty good baseline- as well as the one tablespoon scoop. My mom also has a hard to find, tiny teaspoon scoop that makes the most adorable tiny cookies. They're easy to find at Target, TJ Maxx, or Pampered Chef. Just make sure to get one with all metal parts- the plastic ones aren't worth anything! Do you have a favorite use for cookie scoops (besides ice cream?) Come back for cake on By The Book Friday- I owe a friend a German Chocolate Cake, so if you have a great recommendation please let me know!

April 12, 2011

TWD- Strawberry Apple Double Crisp

Strawberry Apple Double Crisp{printable recipe here}
My husband, Mr. Carbohydrate himself, loves fruit crisp in any variety so I knew this week's Tuesdays with Dorie treat, Strawberry Rhubarb Double Crisp would be a hit. Of course I've never made anything with Rhubarb (am I the only one?) and there's none at the store- so I subbed in an easy favorite- apples. They're cheap, delicious, and easy to prepare using my favorite apple slicer and peeler. Strawberries are barely in season and still way too much money so I used some that I had sliced and frozen last summer instead of fresh.

Then I catered to the needs of the group- no nuts, no ginger (fine, that was my doing), and extra cinnamon. A little less sugar in the filling, a little extra citrus, and this crisp was the real deal- even if it was nothing at all like Dorie intended.You could easily sub in different fruit (maybe cran apple next time?) and spices and the end product will be great- you know, butter, sugar, fruit, how bad can that be? Just don't forget the ice cream and come back tomorrow for the Wednesday Want! You can see my loosely based version of the recipe below or the real deal from Sarah here.

Strawberry Apple Double Crisp
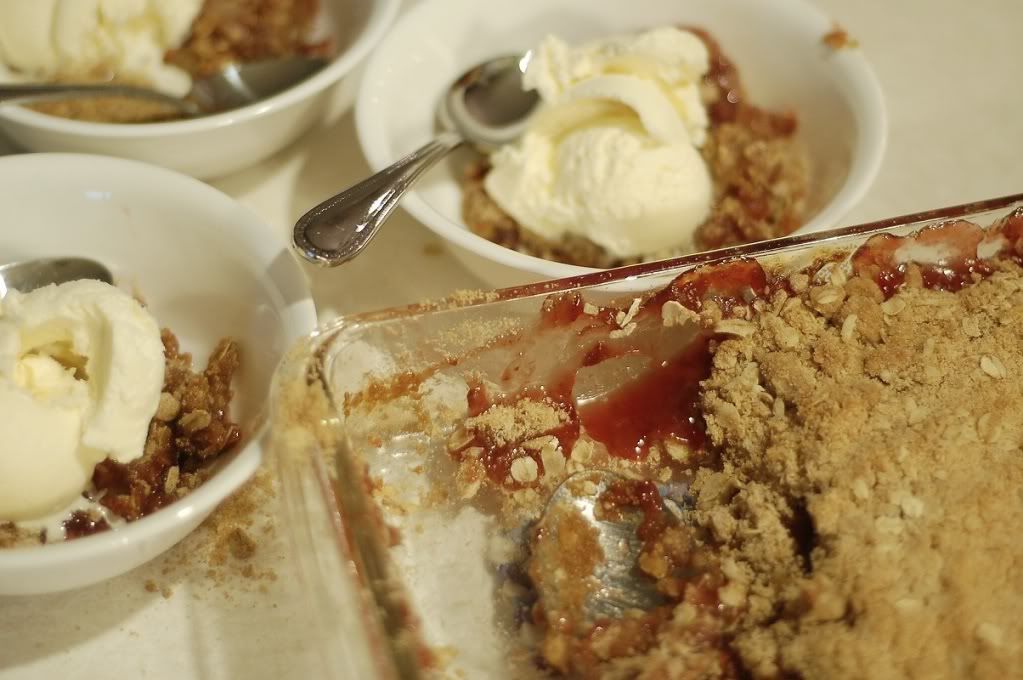
Anne Strawberry Apple Double Crisp
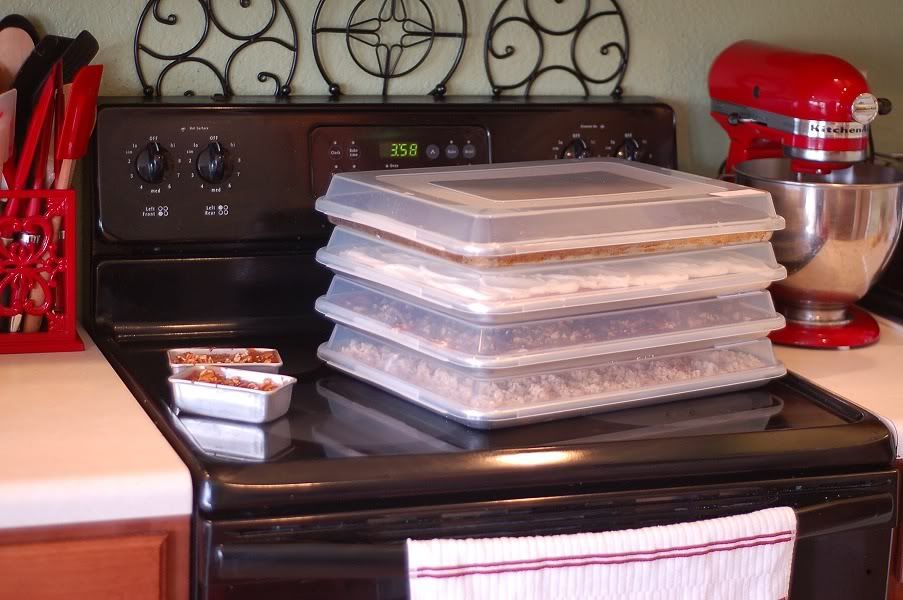
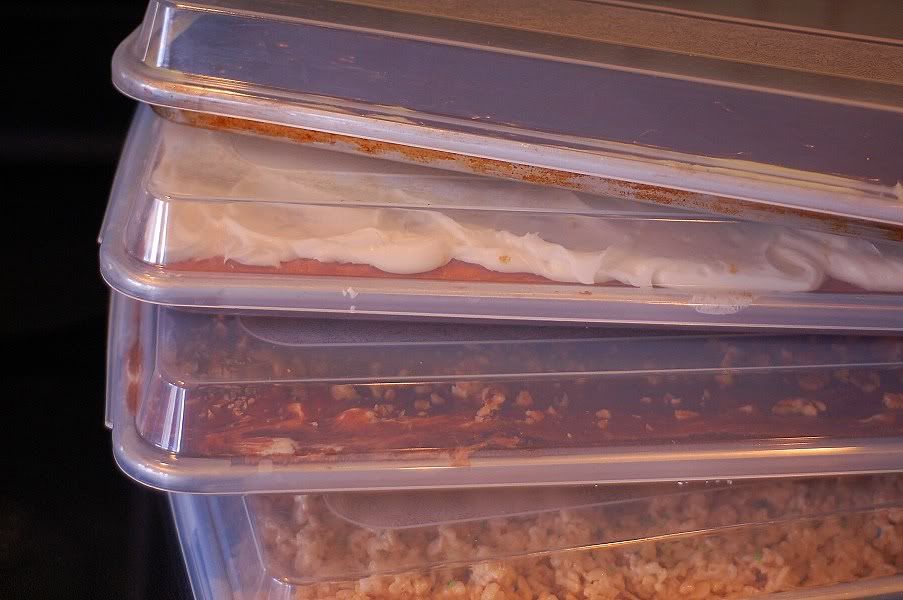
{printable recipe here}
adapted from Baking by Dorie Greenspan

For the Filling:
3 tablespoons cornstarch
1/2 cup cold water
3 cups strawberries, hulled and sliced (about 1 pound)- frozen is fine too
3/4 cup sugar
1 teaspoon vanilla
5 medium apples (pink lady, granny smith, something crisp)
1/2 teaspoon orange zest
zest of half an orange (about a quarter cup)

For the Crisp:
1 cup flour
1 cup dark brown sugar, packed
1 cup oats
pinch of salt
1/8 teaspoon cinnamon
1 stick (1/2 cup) butter, melted and cooled

Preheat the oven to 350. Set a baking dish (I used a medium rectangular pyrex, something around 9 x 9 or 7 x 11) on top of a baking sheet.

Stir together the water and cornstarch and set aside to dissolve. In a medium saucepan, combine the strawberries and sugar. Using a fork, wooden spoon, or potato masher, cook the strawberries over medium heat, while stirring, until the mixture comes to a boil. Whisk in the cornstarch mixture and bring it back to a boil. Cook for 2 or 3 minutes until the filling is thick and turns clear. Stir in the vanilla and set aside while you prepare the apples.

Peel and slice the apples into halved, 1/2 inch thick wedges. Toss with orange zest and juice and set aside.

To prepare the crisp- combine the flour, sugar, oats, salt, and cinnamon in a large bowl and blend with your fingers. Pour over the melted butter and gently combine ingredients with a fork.

Put half the crumbs into the bottom of the pan and pat down to make a crust. Pour in the apples and pour over the strawberry filling. Smooth the jam and evenly sprinkle over the rest of the crumb mixture. Bake for 50-60 minutes, until slightly browned, bubbly, and fragrant. Allow to cool for five or ten minutes and serve warm with ice cream.

April 8, 2011

By the Book Friday- Sheet Cakes

Photobucket
I kind of hate sheet cake. Not really, I mean, it's easy to make, transport, and serve- but there's no way to try a bit just to make sure things are okay before you send them off! Or to snitch a bit of the tempting mint brownies! I've been hoping to get some great new recipe tried this week for today's post but when it came down to it, I needed to make dessert for 80 guys tonight I didn't really want to make something new and fancy when I needed quantity and dependability, so I stuck with trusty old favorites. They don't technically meet my own 'by the book Friday' parameters but if there was an Anne Strawberry Cookbook (At Home with Anne Strawberry? See Anne Strawberry Burn through a Ton of Butter and Flour? All the Stuff Anne Strawberry Tries to Fatten Her Friends and Family with?) these would each be in there. Well, minus the Rice Krispie treats. Those are just not my style but my tall man will jump through hoops for them so I included a batch. I bet they will get eaten quickly even if I don't like them! And the chocolate, well, I couldn't decide between the mint brownies and the Texas sheet cake as I mentally tried a piece. Fortunately for me, I thought the sheet cake looked a little full before I baked it (ahem, that's a lie) so I reserved a tiny bit of batter for two mini cakes for the ladies tonight. They look so great in their tiny little pans, covered with pretty chocolate icing and pecans. Yum. I hope the men appreciate the chocolate (do they really?)

I read this poem today on Clover Lane and had to share. It's very sweet and I think I need to print it up for my house. Loving BMWs, pretty furniture, and expensive chocolate is easy enough. I need to focus on finding the beautiful in the everyday (even Rice Krispie treats?)

Learn to like what doesn't cost much.
Learn to like reading, conversation, music.
Learn to like plain food, plain service, plain cooking.
Learn to like fields, trees, brooks, hiking, rowing, climbing hills.
Learn to like people,
even though some of them may be different...
different from you.
Learn to like to work and enjoy the satisfaction of doing your job as well as it can be done.
Learn to like the songs of birds, the companionship of dogs.
Learn to like gardening, puttering around
the house and fixing things.
Learn to like the sunrise and sunset, the beating of the rain
on the roof and windows,
and the gentle fall of snow on a winter's day.
Learn to keep your wants simple and
refuse to be controlled by the likes and dislikes of others.
Lowell Bennion

Now if you'll excuse me, I'm off to enjoy some girl time with Baby Strawberry. We're going to try painting her toe nails again (and hopefully we'll have better results this time!) And cross your fingers that all my well loved, carefully labeled (if not shined) sheet pans and lids make it home. I'm not going to lie, I'm a little nervous...

PhotobucketTop to bottom:
Mint Brownies (aka BYU Brownies)
Lemon Cake (this time I used a lemon cream cheese icing instead of the citrus glaze since I was out of juice)
Texas Sheet Cake
Rice Krispie Treats (from the box, plus some sprinkles to jazz them up!)

April 6, 2011

Wednesday Want- French Rolling Pin

Photobucket
As I'm starting this new Wednesday Want tradition, I don't want you all to think, "sure, that would be great, but ____ costs a ton so oh well." I get enough of that feeling reading design blogs! Some of my favorite kitchen tools (like my beloved Empire Red) are pricey- but lots of them are not, thanks to awesome places like TJ Maxx, Ross, Target, and Amazon. So it is with today's item. I used to have a great marble rolling pin. It was pretty, heavy, too much money, and I was always afraid I would drop it on my foot. I can't remember why I ended up with one of these amazing French rolling pins but I haven't stopped buying them since (I needed a back up at mom's for when I'm making pie over there!) Unlike a traditional rolling pin, the French rolling pin is lightweight, nice and long, and doesn't have any handles to snap off when you are fighting to roll out a batch of dough. It's pretty and you can buy them with tapered ends or not. And even if you don't like to make pie or sugar cookies, there's so many great things to use it for. Here's some of my favorite-

Photobucket 

Photobucket
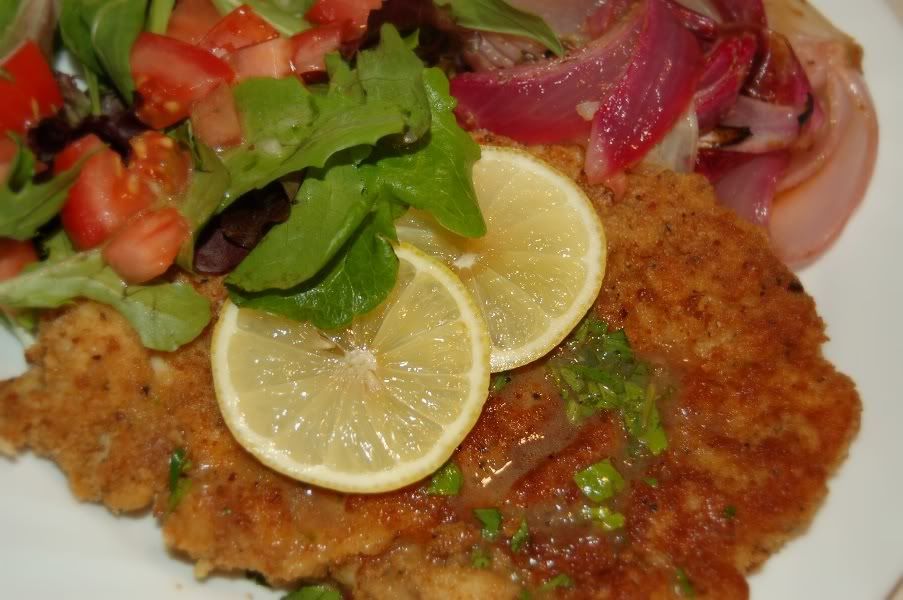
Chicken Piccata- I put the chicken in a baggie, cover it with a dish towel, and use the rolling pin to flatten it so it cooks nice and evenly. Don't use your wooden rolling pin to beat raw chicken, bleh!

Photobucket 


They're about ten bucks on Amazon but mine came from TJ Maxx (about 6 bucks). The more you use it the prettier it will get- mine is a rich, golden color now and feels smooth and useful in my hand. After I've used it, I wipe it down with a clean, damp cloth and stash it away for next time. I'm still finding more uses and hope you will give it a try. Do you have a favorite kind of rolling pin? Am I the only one who loves hers enough to post about it?! :)

April 1, 2011

By the Book Friday- Roasted Red Pepper Goat Cheese Tarts

Photobucket
{printable recipe here}
Ina Garten is my favorite so I figured I should start with one of her recipes for my first "By the Book Friday". I really want to focus on trying new things and actually getting through my cookbooks instead of just using them as decorations. I planned to take a nice picture of my cookbooks to show the material I would be working with for this new challenge but my hutch is just too crammed full of books (so next week, maybe?) We had Church recipe group this week and I happened to have a jar of roasted peppers, several boxes of puff pastry I scored at half off, and goat cheese, cheap from Trader Joe's. Everything else required was already in the pantry so I figured this was perfect. These tarts are so great- flavorful, crunchy, creamy, sweet, savory. It takes some time with the caramelized onions but every step is simple and the final product is stunning (even if the older women at recipe night told me the cheese smelled like goats! I think they liked it though!)

A few people asked to join up with By the Book Friday and so I signed up with Mr. Linky to get a widget, but I haven't gotten my sign up info yet so (hopefully) next week we will be good to go! Feel free to leave a link to your post in the comments if you've joined in! And please if you have a better name idea let me know!


PhotobucketRoasted Red Pepper & Goat Cheese Tarts
from Anne Strawberry
recipe adapted from Ina Garten's Back to Basics
{printable recipe here}

1 package (17.3 ounces/2 sheets) puff pastry, defrosted {I thaw it overnight in the fridge}
Good olive oil
4 cups thinly sliced yellow onions (2 large onions)
3 large garlic cloves, cut into thin slivers
Kosher salt and freshly ground black pepper
3 tablespoons dry white wine {I used a 1/4 cup white grape juice}
2 teaspoons minced fresh thyme leaves
1/2 freshly grated parmesan or romano cheese
4 ounces garlic-and-herb goat cheese {I used regular goat cheese}
1 large tomato, cut into 4 (1/4-inch-thick) slices {note- I used 3/4 cup roasted red peppers or sliced bell peppers in the past}
3 tablespoons julienned basil leaves


Unfold a sheet of puff pastry on a lightly floured surface and roll it lightly to an 12 by 12-inch square. Cut sheet into thirds each way, to yield 9, 3 x 3 squares per sheet (18 total). Place the pastry squares on 2 sheet pans lined with parchment paper and refrigerate until ready to use.


Heat 3 tablespoons of olive oil in a large skillet over medium to low heat and add the onions and garlic. Saute for 15 to 20 minutes, stirring frequently, until the onions are limp and there is almost no moisture remaining in the skillet. Add 1/2 teaspoon salt, 1/4 teaspoon pepper, the wine, and thyme and continue to cook for another 10 minutes, until the onions are lightly browned. Remove from the heat.

Preheat the oven to 425 degrees F.

Using a sharp paring knife, score a 1/4-inch-wide border around each square (being careful to go through only part of the pastry, just use gentle pressure). Prick the pastry inside the score lines with the tines of a fork and sprinkle a tablespoon of grated Parmesan on each tart, staying inside the scored border.

Place a teaspoon of the onion mixture on each circle, again staying within the scored edge. Crumble goat cheese on top of the onions. Place a slice of tomato (or bell peppers or roasted bell peppers) in the center of each tart. Brush the tomato lightly with olive oil (not necessary with the roasted peppers) and sprinkle with basil, salt, and pepper. Finally, scatter 2 or 3 shards of Parmesan on each tart.

Bake for about 20 minutes, until the pastry is golden brown. The bottom sheet pan may need an extra few minutes in the oven. Serve hot or warm.